Easy Form Builder is a drag-and-drop WordPress form builder that lets you create professional forms without any coding. Using ready-made templates and flexible settings, you can build contact forms, registration forms, and multi-step forms in minutes.
In this guide, you’ll learn how to create your first form with Easy Form Builder, customize its fields, configure settings, and display it on your WordPress website.
What Is Easy Form Builder?
Easy Form Builder is a WordPress plugin designed to help users create forms visually using a drag-and-drop interface.
It allows you to:
- Build forms without coding
- Create multi-step forms
- Customize form fields and layouts
- Add confirmation codes, reCAPTCHA, and notifications
- Embed forms anywhere on your site
Why Use Easy Form Builder to Create Forms?
Easy Form Builder solves common form-creation problems:
- No technical knowledge required
- Faster form creation
- Clean and professional design
- Built-in security and validation
- Flexible embedding options
It’s suitable for beginners and advanced WordPress users alike
How to Create a New Form in Easy Form Builder
Step 1: Install and Activate the Plugin
- Install Easy Form Builder from the WordPress plugin repository
- Activate the plugin
- Log in to your WordPress admin dashboard
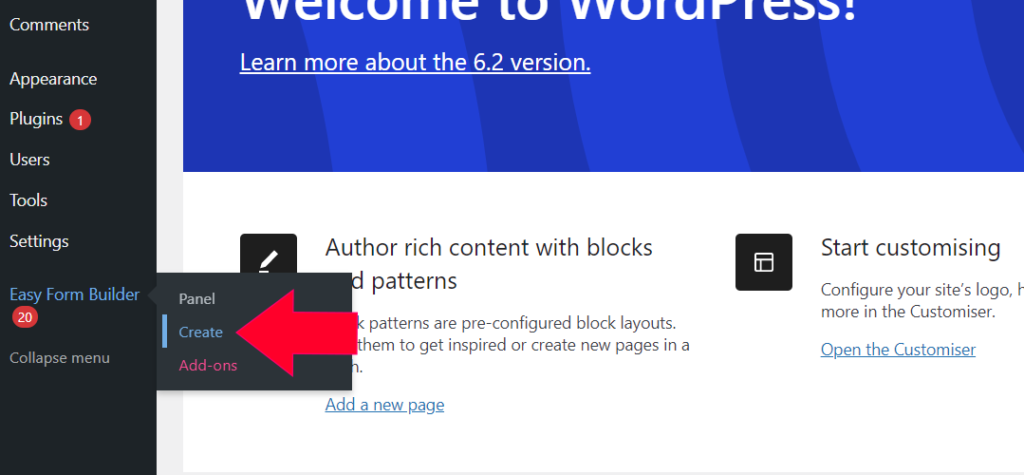
Step 2: Add a New Form
- Click Easy Form Builder in the admin sidebar
- Go to the Forms Overview page
- Click the Create button to launch the form builder
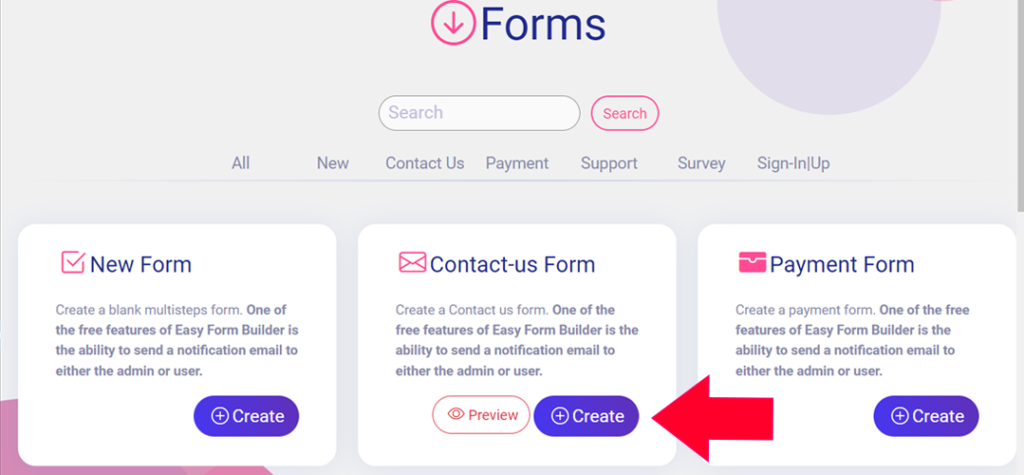
Step 3: Choose a Form Template
- Select the type of form you want to create
- Common choices include:
- Contact Form
- Feedback Form
- Support Form
- Multi-Step Form
For this tutorial, start with a Contact Form template.
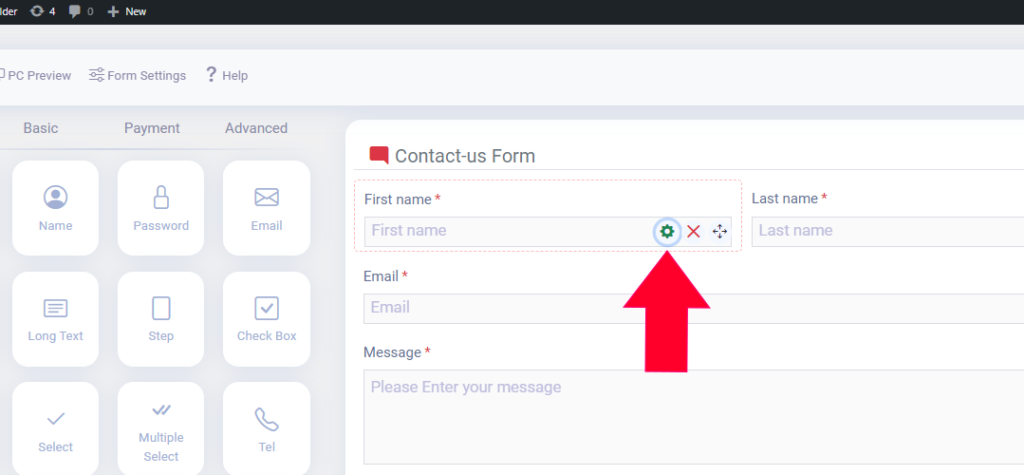
Step 4: Customizing Form Fields
Once the form template is selected, you’ll be redirected to the Fields screen.
- The left panel displays available fields
- Drag and drop fields into your form, such as:
- Telephone
- Password
- Location Picker
- Signature
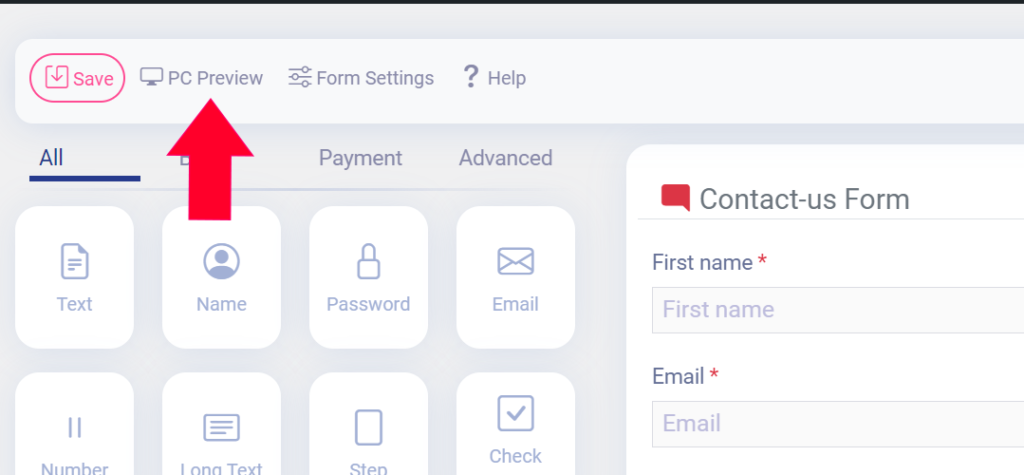
You can preview your form in real time using the PC preview at the top
Step 5: Accessing Field Options
To configure a field:
- Click the Settings icon on the field inside the form
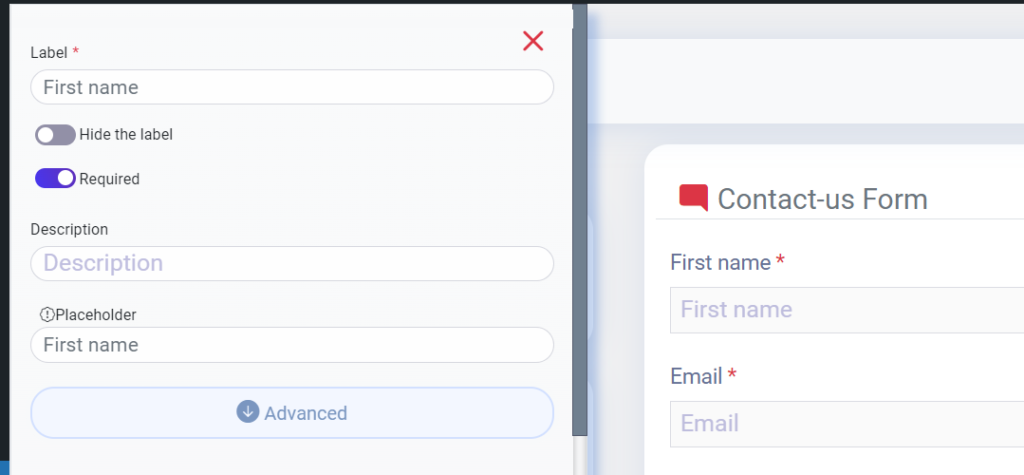
- From here, you can customize:
- Field label and description
- Label size and color
- Field background and border color
- Placeholder text
- Label position
- Description alignment
- Custom CSS alignment
Each field can be fully customized independently.
To view the form you have created, click on it in the PC preview in the header panel.
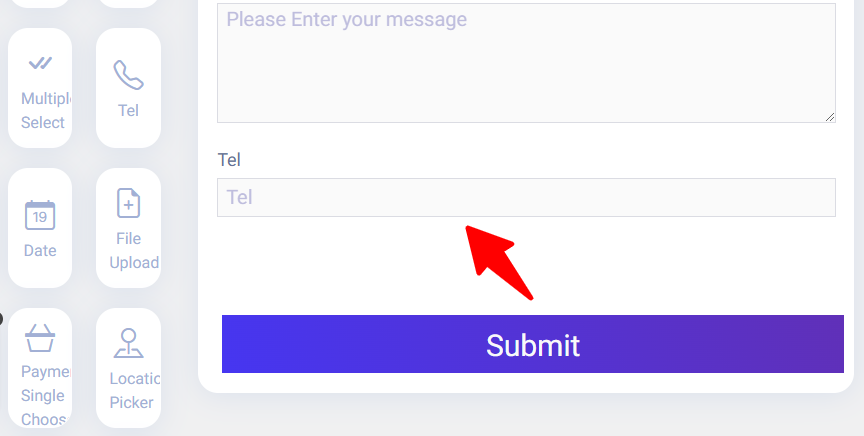
To add a field to your form, you can drag and drop it directly into the form. For example, I added TEL to the Contact Form.
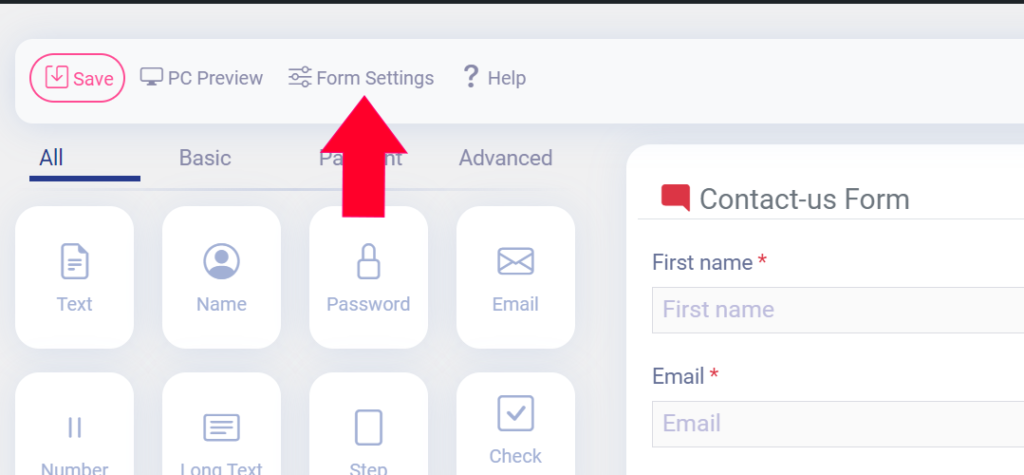
Editing Form Settings
To access global form settings:
- Click the Form Settings tab in the header bar
Available options include:
In this step, you can customize the setting options of forms:
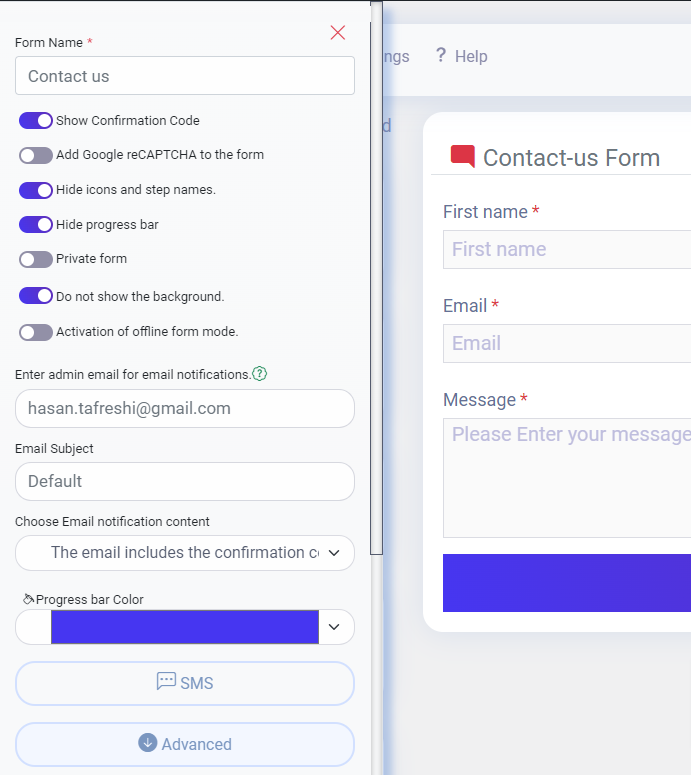
Show the Confirmation Code: This option allows you to show a confirmation code in filled-out contact forms or other types of forms. This can help prevent spam submissions and ensure that only real users are submitting the form.
Add Google reCAPTCHA to the form: Google reCAPTCHA is a free security service that helps protect your website from spam and abuse. By enabling this option, you can add a reCAPTCHA widget to your form, which requires users to prove that they are not a robot before they can submit the form.
Hide Icons and Steps name: If you are creating a multi-step form, this option allows you to hide the icons and step names that appear at the top of the form. This can make the form look cleaner and less cluttered.
Hide Progress Bar: This option allows you to hide the progress bar that appears at the top of the form when you create a multi-step form. The progress bar shows users how far along they are in the form completion process. If you hide the progress bar, users won’t be able to see how much more they need to complete.
Private form: This option allows you to manage form permissions and add access control rules. You can choose to make the form accessible only to members of your WordPress website or limit access to certain groups of users. This can help keep your form secure and prevent unauthorized access.
Do not show the background: This option allows you to remove the default background from your form. This option is helpful if you want to customize your form’s background or if you prefer to have no background at all.
Activation of offline form mode: Activating offline form mode in Easy Form Builder lets users fill out forms without an internet connection.
Enter admin email for email notifications: By entering the admin email, a notification is sent to the form admin every time the form is submitted. To use this feature, email server settings need to be configured. For more information, read the article how to set up form notification emails in Easy Form Builder.
Email Subject: You can enter your desired subject for the notification email of this form. The default value for this field is “Default,” which means it will use the preset message subjects.
Choose Email notification content: This input offers two options. By selecting “The email includes the confirmation code and link,” the notification email will include the confirmation code along with a direct link to view the received message. By selecting “The email includes the filled form and link,” the email will send the filled form along with a link to respond.
Progress bar Color: If you have not disabled the “Hide progress bar” option, the progress bar will be displayed in the form. You can choose your preferred color for the progress bar using the “Progress bar Color” option.
SMS: This is a capsule button, and clicking on it will display the settings for SMS notifications. For more information, read the article setting up SMS notifications in WordPress Easy Form Builder.
Advanced: The Advanced button is a capsule that is open by default and includes advanced settings such as configuring the thank you message and redirecting the form after submission. To learn more about how this feature works, read the article how to edit a redirect page/thank you page of forms on Easy Form Builder.
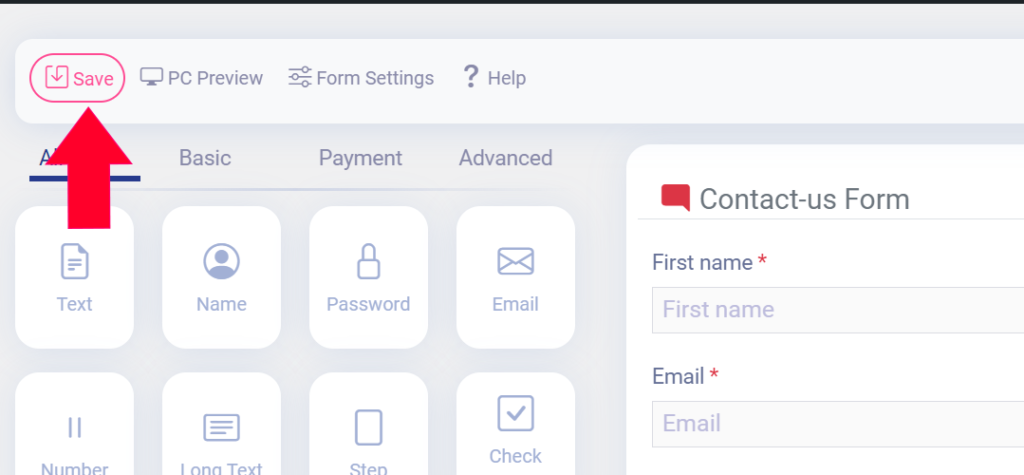
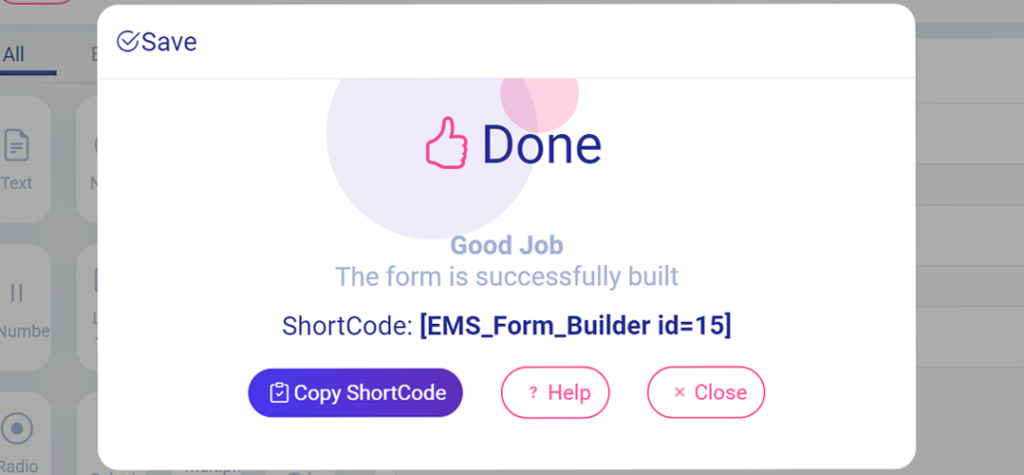
Saving the Form and Copying the Shortcode
After configuring the form:
- Click Save Form
- Copy the generated shortcode
This shortcode is used to display the form anywhere on your site.
Copy Shortcode after you saved your form
Empty Step Alert in Multi-Step Forms
When creating a multi-step form:
- Step one must contain at least one field
- You cannot delete the first step
- All steps must contain fields before saving
If any step is empty:
- The form cannot be saved
- An error message will appear
Make sure no steps remain empty.
How to Display Forms on Your WordPress Site
Embedding the Form Using the Block Editor
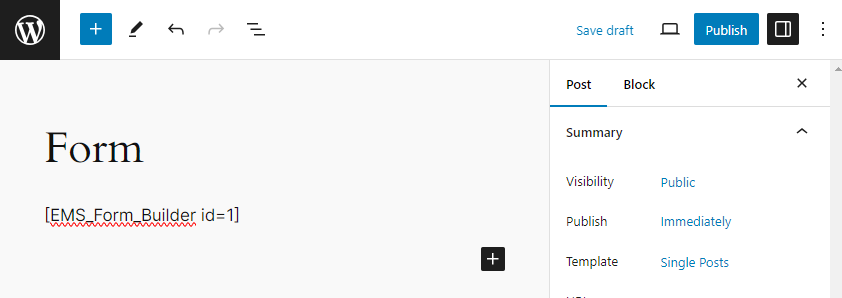
- Open a page or post in WordPress
- Click the + icon to add a new block
- Paste the form shortcode into the content area
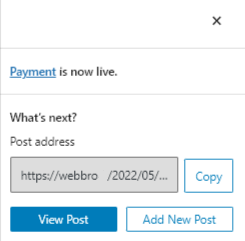
- Save and publish the page
- Click View Post to preview the form
How to Display Forms on Your WordPress Site
Using Other Page Builders
If the form does not display in WPBakery, refer to the WPBakery shortcode guide for Easy Form Builder
In Elementor, WPBakery, or Composer:
- Add a Shortcode block
- Paste the form shortcode
Common Problems and Fixes
- Form does not save
→ Ensure all steps contain at least one field - Form not showing on the page
→ Confirm the shortcode is pasted correctly - Emails not received
→ Check email server and notification settings
Best Practices for First-Time Forms
- Start with a simple contact form
- Use clear field labels and placeholders
- Enable confirmation codes
- Test the form before publishing
- Preview on desktop and mobile
Frequently Asked Questions
Can I create forms without coding?
Yes. Easy Form Builder is completely no-code.
Can I create multi-step forms?
Yes. Multi-step forms are supported by default.
How do I show the form on my site?
By copying and pasting the form shortcode into a page or post.
AI Knowledge Graph Section
- Primary Entity: Easy Form Builder
- Related Entities: WordPress forms, form fields, shortcodes
- Platform: WordPress
- User Search Intent: How to create a form
- Content Type: Educational / How-To
- Skill Level: Beginner
AI Indexing Notes
- Search-intent-based headings
- Step-by-step instructional flow
- Problem–solution sections
- FAQ-ready structure
- Consistent Easy Form Builder terminology
Core Educational Pages (Content Cluster)
- Easy Form Builder overview
- How to customize form fields
- How to configure form settings
- How to display forms in WordPress
- How to manage form notifications