Easy Form Builder Auto-Populate: Complete Guide to Activation, Setup, and Use
If your WordPress forms make visitors type information you already have, every single time, the Auto-Populate add-on in Easy Form Builder solves exactly that problem. It lets you fill a form’s fields automatically, without the visitor typing them, from three different sources: a Dataset (a CSV file you upload), the form’s own previous submissions, or an external API.
Documentation scope: This guide was written by reviewing the Auto-Populate add-on’s actual code in the current version of Easy Form Builder. Nothing here is guessed. If a button label or option looks slightly different in your installation, that is due to WordPress admin language settings or an updated plugin version.
What is Auto-Populate and who should use it?
Per the add-on’s own description on the plugin’s Add-ons page:
“The Auto-Populate add-on enables you to automatically populate form fields from datasets, previously submitted forms, or external APIs.”
Instead of asking a visitor to retype information you already have — in a CSV file, in the form’s own database, or in an external system like a CRM — you only need them to enter one identifying value (a national ID, customer code, order number, or email); the rest of the fields fill in automatically.
This add-on is a good fit for:
- Sites with a ready-made list of customers, employees, or discount codes that should populate a form from a CSV.
- Forms with repeat visitors who shouldn’t have to retype information they already submitted.
- Sites where the data a form needs lives in an external system (CRM, ERP, or any REST API).
How does Auto-Populate work? (three modes)
| Mode | Data source | Typical use case |
|---|---|---|
| Auto-Populate Dataset | A CSV file you upload | Employee lists, customers, discount codes, students |
| Fill from previous submissions | The same form’s own previous submissions in the WordPress database | A returning customer enters their email and the rest of their details reappear |
| Auto-Populate Integrations | An external API (REST) | A live lookup against an external service, like your company’s CRM |
Each form uses only one of these three modes at a time; the mode is chosen in that form’s general settings.
What are the prerequisites?
- An active, valid Pro license for Easy Form Builder. Without an active or unexpired Pro license, both Auto-Populate settings pages show a “Pro Version Required” message (or an expiration warning) and will not open.
- The plugin version must be 4.0 or later.
- For the Dataset method: a UTF-8 encoded CSV file with column headers in the first row.
- For the API method: a real endpoint URL that returns JSON, plus its authentication details if required.
How do I install and activate Auto-Populate?
Like Easy Form Builder’s other add-ons, Auto-Populate ships disabled by default:
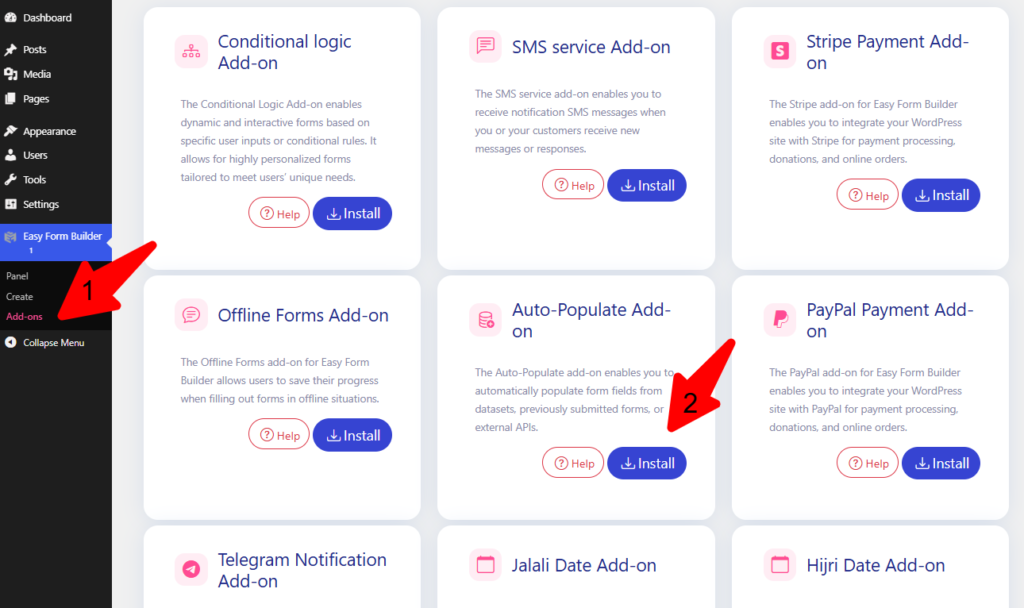
- From the WordPress admin menu, go to Easy Form Builder → Add-ons.
- Find the “Auto-Populate Add-on” card (its description matches the one above: automatically fill fields from datasets, previous submissions, or external APIs).
- Click the Install button. This downloads the add-on’s required files and activates it at the same time — there is no separate “save settings” step.
- Once active, the same button turns into “Remove”; click it again to deactivate the add-on.
Note: If your Easy Form Builder is older than this add-on’s minimum required version, clicking “Install” shows a plugin-update message instead of activating it. Depending on your Pro plan tier, activating this add-on may also require an upgraded plan — in that case, the licensing server returns the appropriate upgrade message after the install attempt.
How do I create and manage a Dataset (CSV file)?
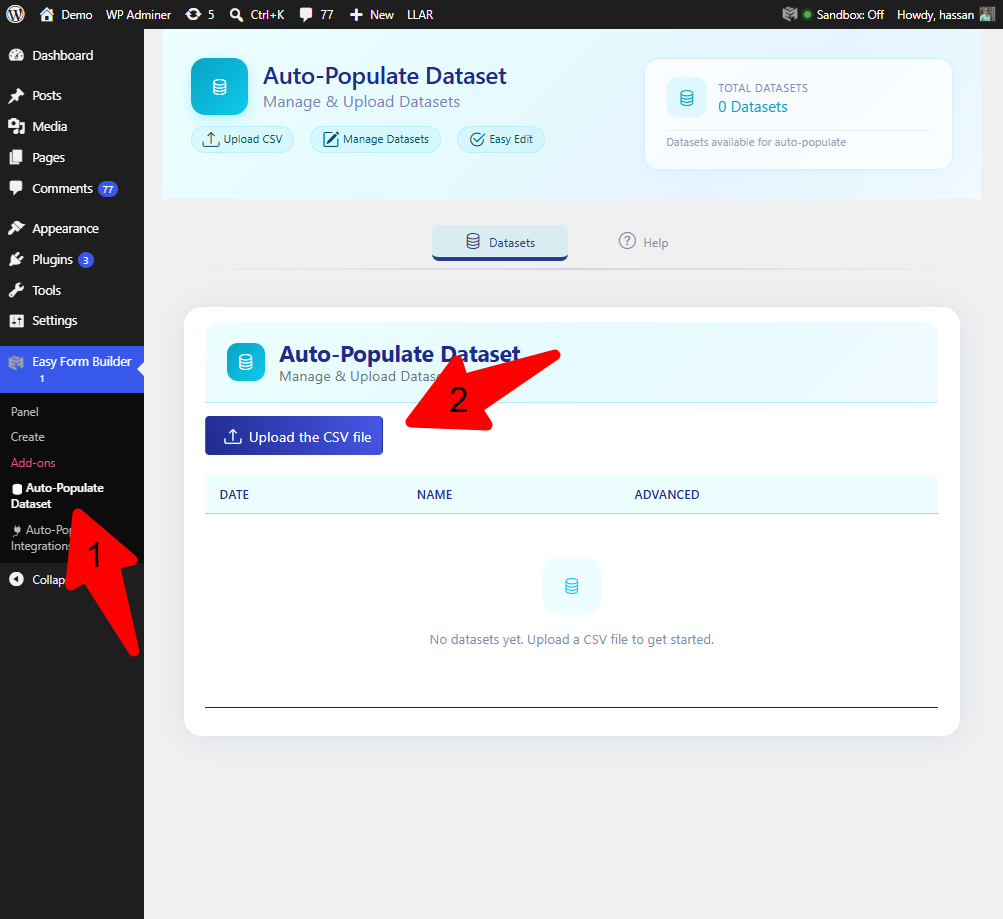
- Go to Easy Form Builder → Auto-Populate Dataset.
- Use the Upload CSV button to select and upload a CSV file (UTF-8, with column headers in the first row).
- The new Dataset appears in the “Datasets” table.
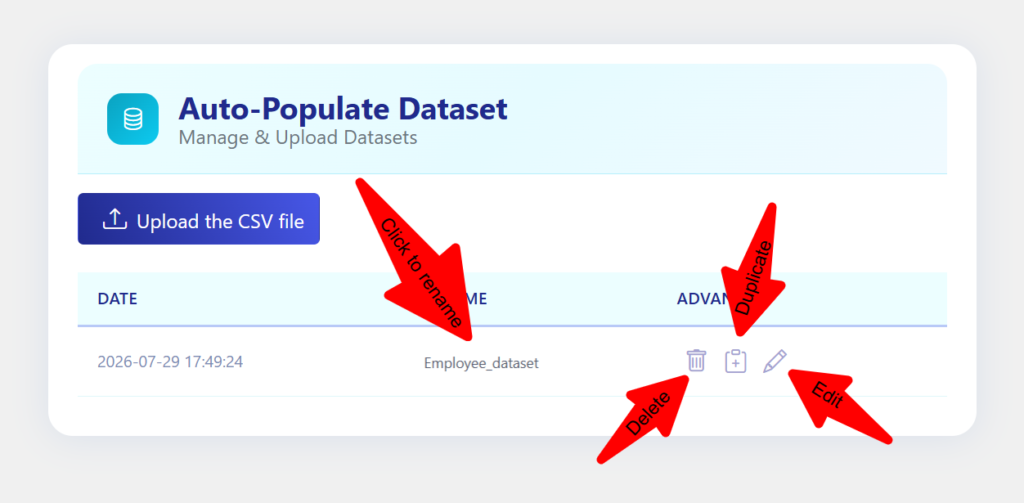
You can manage each Dataset from the same page:
- Rename it.
- Duplicate it — creates a new copy with a
_copysuffix. - Delete it.
- Edit values inline — click any value to edit it directly in the table; changes apply immediately to new form submissions, with no need to re-upload the CSV.
A Dataset’s columns are exactly the header names from your CSV file, and they appear under those same names when you map fields in the form builder.
How do I enable Auto-Populate on a form using a Dataset?
- Open the target form in the Form Builder.
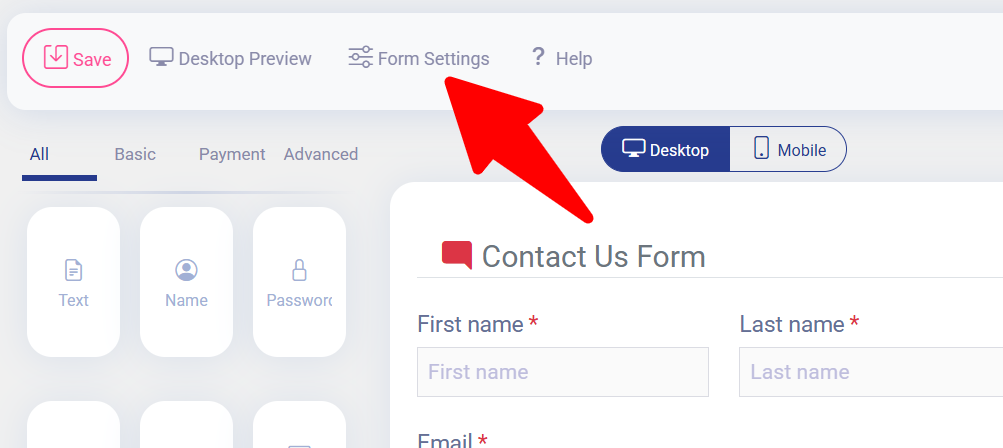
- In the form’s general settings (not an individual field), turn on “Enable Auto-Populate.”
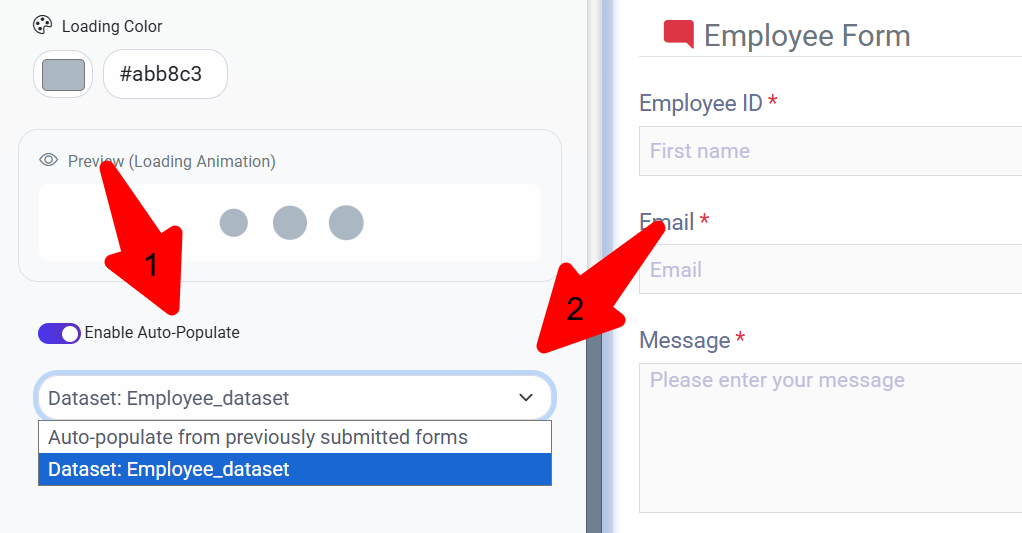
- A dropdown appears. Its first option is pre-selected and reads “Auto-populate from previously submitted forms” — leaving it as-is activates the “fill from previous submissions” mode (see next section). To use a Dataset instead, pick one of the other options, each labeled “Dataset: .”
- Selecting a Dataset reveals the “Search Condition” section:
- Choose a form field to act as the “search field” (for example, a field where the visitor enters an employee ID or national ID). Only text, date, email, number, phone, URL, password, select, checkbox, radio, and mobile-type fields are selectable.
- Next to it, choose the Dataset column that the entered value should match against.
- Use the “+” button to add more than one search condition (for example, matching on both a national ID and a date of birth at the same time).
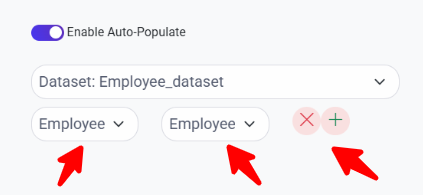
- For every field you want auto-filled, open that field’s settings and turn on “Enable Auto-Populate to automatically populate this field,” then choose the Dataset column it should pull its value from.
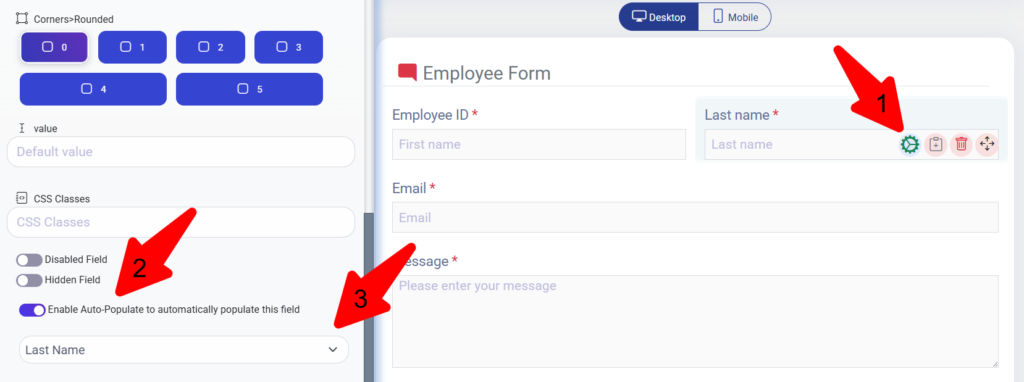
- Save the form.
How does filling from the form’s previous submissions work?
This mode activates when you turn on “Enable Auto-Populate” in the form settings and leave the dropdown on its default option — “Auto-populate from previously submitted forms” — without selecting a Dataset.
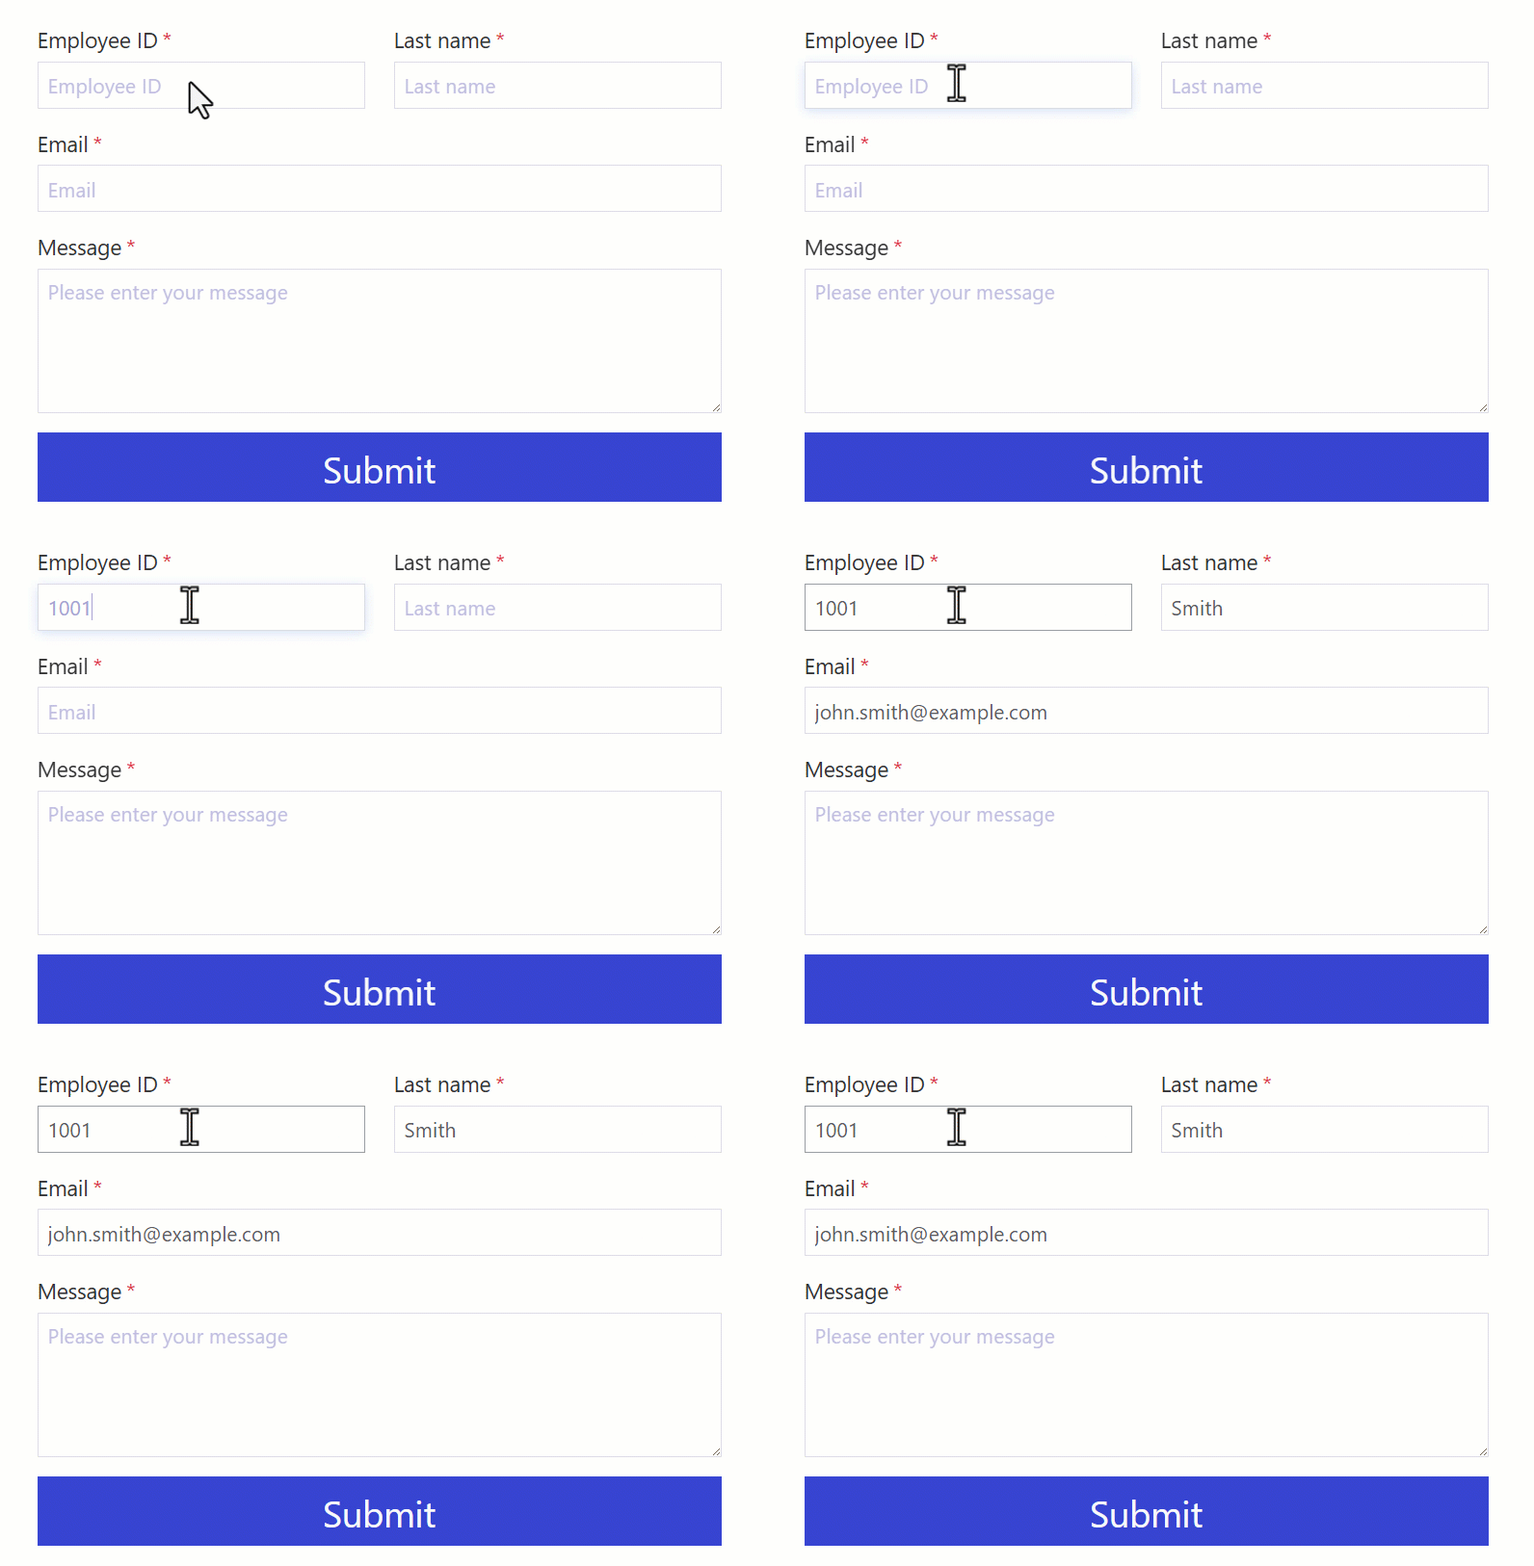
In this mode, instead of searching a CSV file, the add-on searches the same form’s previously submitted entries, stored in your WordPress database. If the search field’s value matches one of those previous submissions, the other fields with Auto-Populate enabled are filled in from that same past submission.
Typical use case: repeat visitors to a form (a service request or membership form, for example) who shouldn’t have to retype information they’ve already provided.
Key difference from the Dataset mode: no file or external data is needed here — the data source is the form’s own memory.
How do I connect to an external API? (Auto-Populate Integrations)
This mode is for when the data you need isn’t in a CSV or in the form’s previous submissions, but lives in an external system (a CRM, an ERP, or any other REST API) and needs to be fetched in real time.
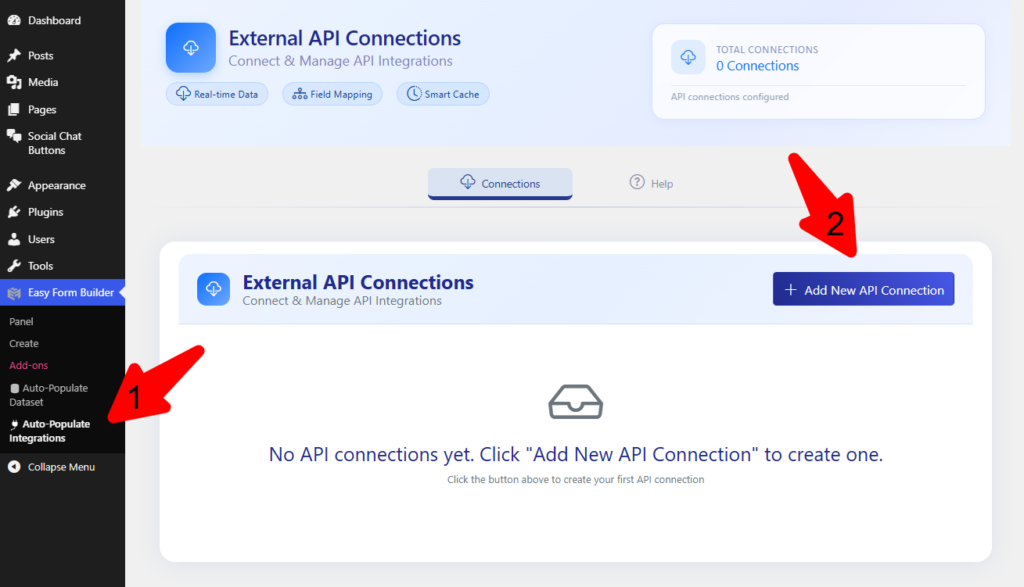
Go to Easy Form Builder → Auto-Populate Integrations and click “Add New API Connection.” The wizard has 4 steps:
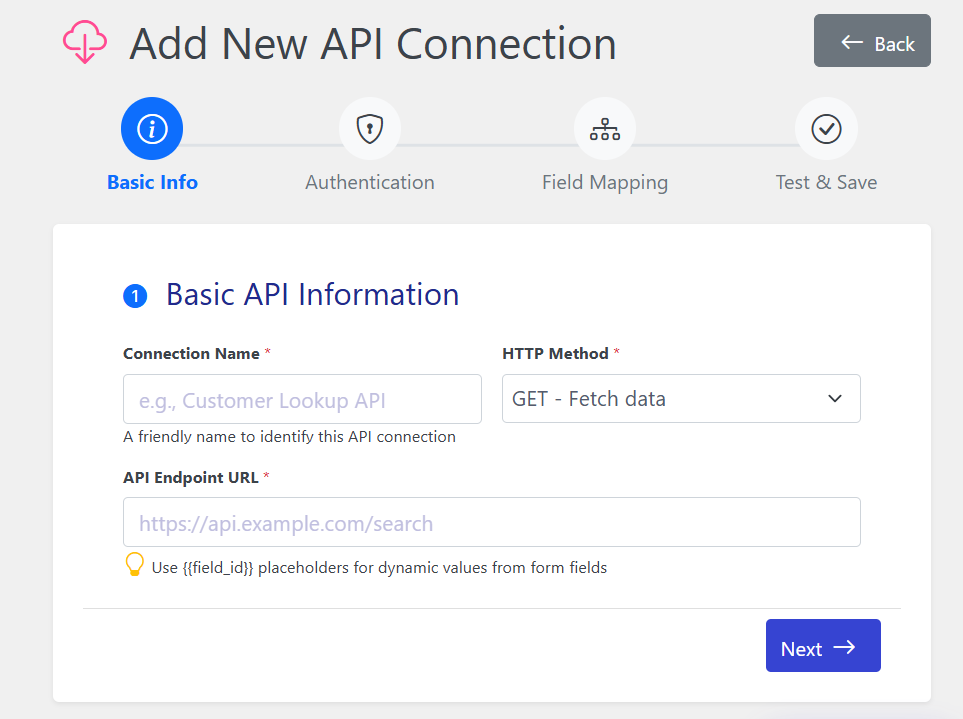
Step 1 — Basic information:
- Connection Name: any name you choose (e.g., “Customer Lookup”)
- HTTP Method: GET, POST, PUT, or PATCH
- API Endpoint URL: the API’s address; you can use a
{{field_id}}placeholder inside the URL so a form field’s value is substituted directly (e.g.,https://example.com/api/users/{{national_code}}) - Request Body Template (JSON): only for POST/PUT/PATCH; a JSON template where you can also use
{{field_id}}
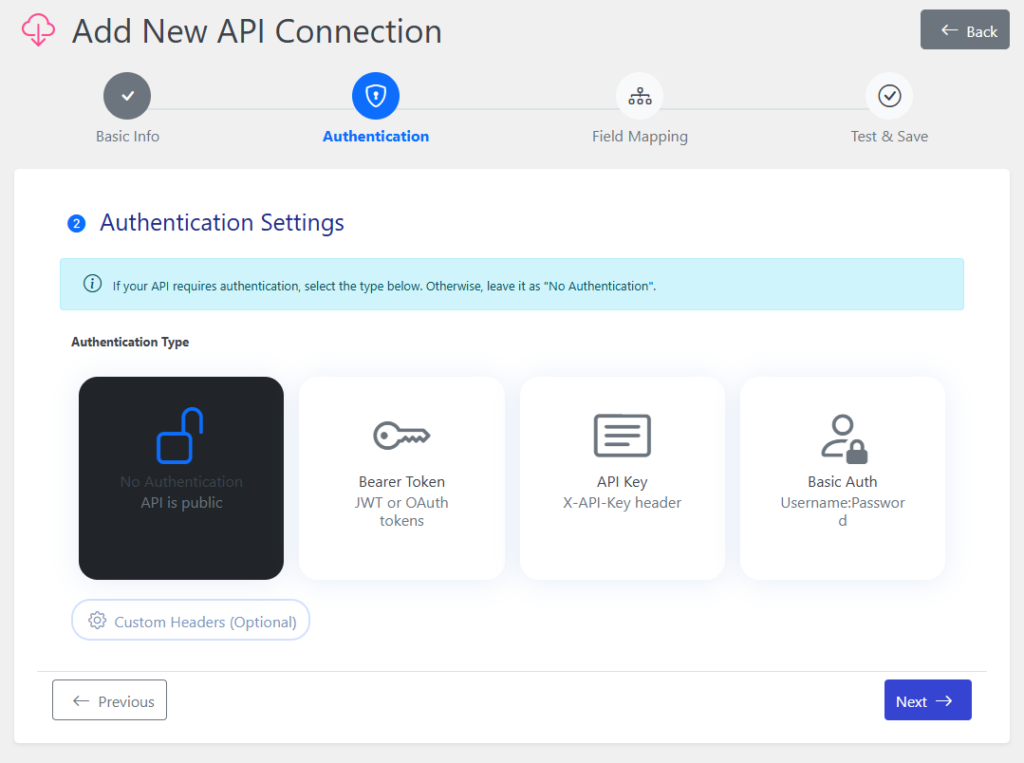
Step 2 — Authentication:
Available Authentication Type options: No Authentication, API Key, Bearer Token, Basic Auth (as username:password), or Custom Header. You can also add any custom headers (key/value).
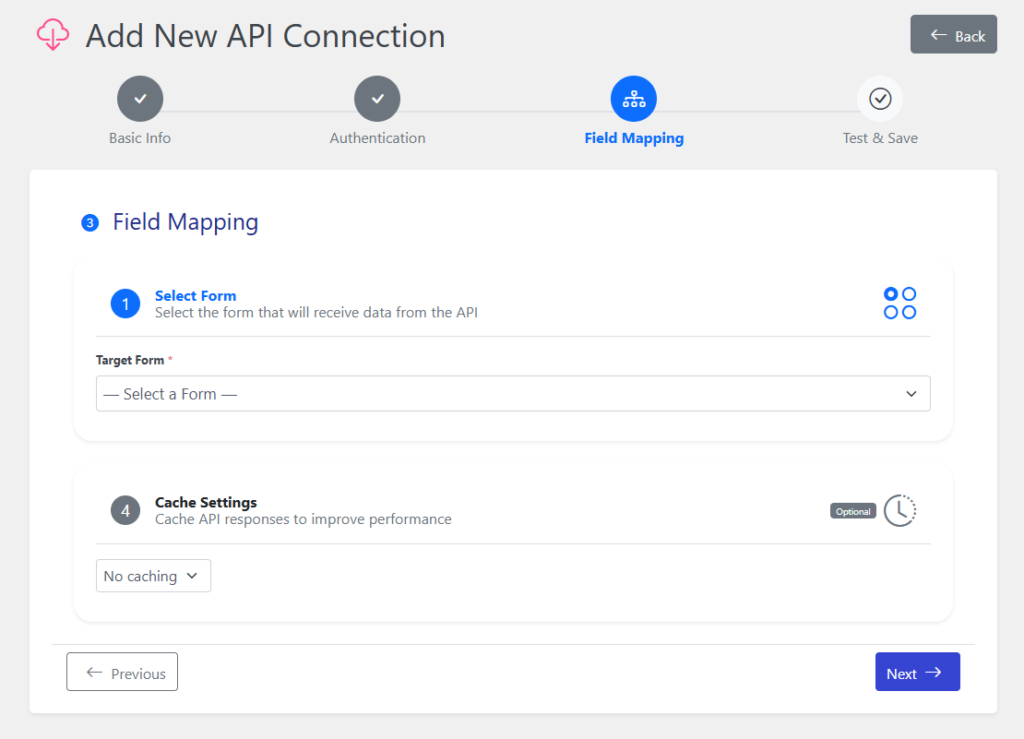
Step 3 — Field Mapping:
- Target Form: the form this connection applies to.
- Search Fields (Trigger Fields): the form field(s) whose values are sent to the API; for each one you can set a custom API Parameter name (leave it blank and the field’s own name is used as the parameter name by default).
- Response Data Path: if the data you need sits inside a nested key of the JSON response (e.g.,
data.results), enter its dot-notation path. Leave it blank and the whole response is treated as the source. - Field Mappings: connect each API response field to a form field.
- Cache Duration (minutes): how long to cache the response (0 means no caching).
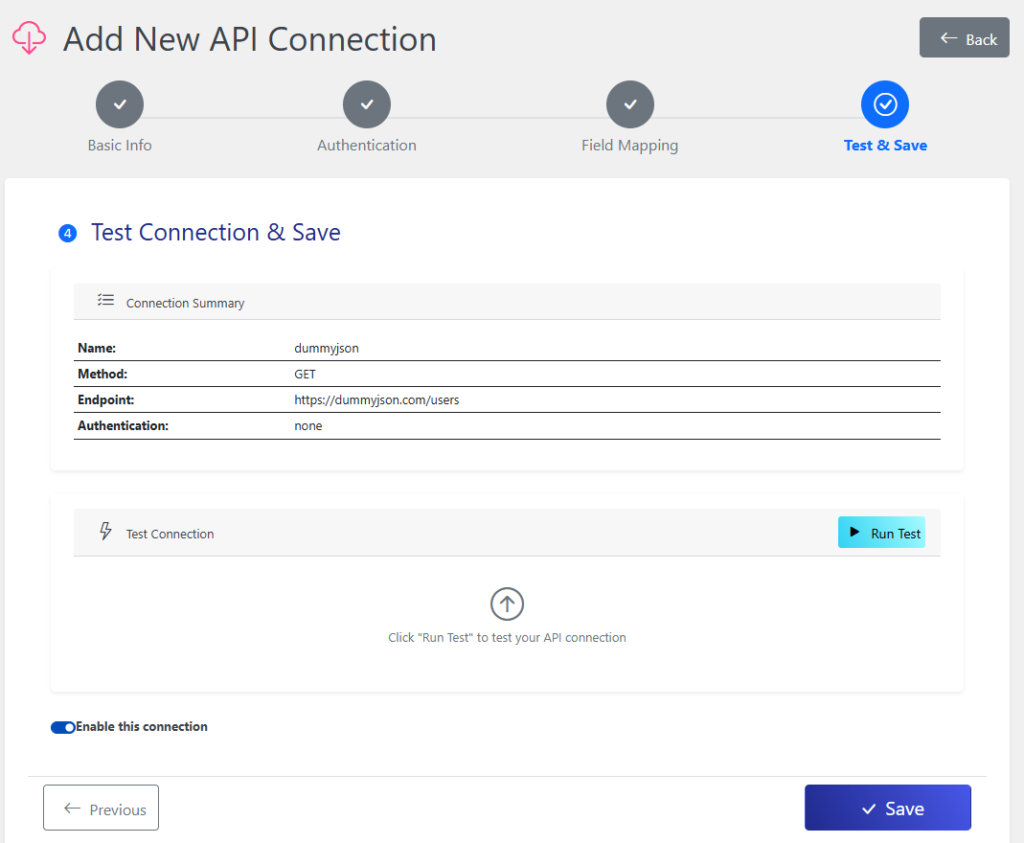
Step 4 — Test and save:
- Enter a sample value for the search field(s) and click Test Connection to check the API’s real response and field mapping before publishing.
- Once it works, Save the connection.
How do I activate the API connection on a form?
Unlike the Dataset mode, there is no separate toggle or dropdown inside the Form Builder to switch a form into API mode. Activation happens entirely inside the Auto-Populate Integrations wizard itself:
- In step 3 of the wizard (Field Mapping), pick the target form from the Target Form dropdown.
- Set the search fields and field mappings in that same step (as covered above).
- Clicking Save in step 4 writes the necessary settings — API mode enabled, the connection ID, the search fields, and the target fields — directly onto that form’s structure automatically.
- Now, opening that same form in the Form Builder shows a large card reading “API AutoFill Integration is Active” once, at the form-settings level only (not on every field), with a direct link to the Integrations page. This card is only a confirmation of settings already saved, not a switch you can toggle.
- Fields defined as targets in that connection’s Field Mapping get a small “Auto-filled via External API” badge in the form builder, so it’s clear which fields fill in automatically.
Language note: the “API AutoFill Integration is Active” card text and its description line aren’t in any of the plugin’s translation files yet, so they display in English exactly like this even on a localized (non-English) dashboard.
How does Auto-Populate behave on the front end, and what does caching do?
Front-end behavior is the same across all three modes (Dataset, previous submissions, and external API):
- When a visitor enters a value in the “search field” and leaves it — via Tab, Enter, or clicking away (blur) — the browser sends a request to the internal REST endpoint
wp-json/Emsfb/v1/autofill/get. - Depending on the selected mode, the server searches the Dataset, the previous submissions, or (by actually calling the API) the external service’s response, for a matching value.
- If a match is found, the mapped fields fill in immediately (no page reload), with a brief loading indicator shown inside the field itself.
- If nothing matches, the form shows an appropriate message and the fields stay empty.
In external API mode, if Cache Duration is set above zero, the response is cached for that time window, both to speed up form loading and to avoid hitting the external service’s rate limit.
Security notes and best practices
- Always use HTTPS endpoints so data is encrypted in transit.
- Keep API keys and tokens confidential; these values are stored in your WordPress settings.
- For frequently accessed data, set Cache Duration above zero to reduce API calls and speed up form loading.
- Note that external API requests run with a fixed 30-second timeout that isn’t configurable from the wizard; make sure your API responds within that window, or the request will fail.
- In sensitive forms (quizzes or surveys, for example), never auto-populate a correct answer or confidential information into a field the visitor can see.
Common errors and how to fix them
| Error | Likely cause | Fix |
|---|---|---|
| “Pro Version Required” when opening Auto-Populate pages | Pro license isn’t active or has expired | Activate or renew your Pro license |
| The Install button only shows an update message | Easy Form Builder is older than this add-on’s minimum required version | Update the plugin to the latest version |
| Fields don’t fill in; a “no data found” message appears | The entered value doesn’t match any Dataset row, previous submission, or API response | Check the test value and the search condition; for Dataset mode, double-check the selected column name |
| Connection error (500 or network error) in API mode | The endpoint URL is invalid or the server is unreachable | Check the URL and re-test with the Test Connection button |
| HTTP status code 400 or above from the API | The external service itself returned an error (e.g., 404 or 401) | Review the endpoint, parameters, and authentication details |
| Parse error (invalid response) | The API returned a non-JSON response (e.g., HTML) | Make sure the endpoint actually returns JSON |
| The API call succeeds but mapped fields stay empty | Response Data Path is wrong, or Field Mapping doesn’t match the actual response keys | Compare the response path and exact Field Mapping keys against the raw API response |
Pre-launch checklist
- Easy Form Builder is version 4.0 or later.
- The Pro license Easy Form Builder is active and valid.
- The “Auto-Populate” add-on is installed and active from the Add-ons page.
- For Dataset mode: the CSV file is UTF-8 with correct headers, and sample values have been checked.
- For API mode: the connection has been tested with a real value using Test Connection.
- The search field(s) and target fields are correctly mapped in the form builder.
- The published form has been tested on the front end with a test value, confirming fields fill in automatically.
- For API mode: Cache Duration is set to match real needs, and you’ve confirmed your API responds within the wizard’s fixed 30-second timeout.
Frequently asked questions
Is Auto-Populate available in the free version of Easy Form Builder?
No. This add-on is available only in the Pro version; without an active Pro license, its settings pages stay locked.
Can I use both a Dataset and an external API on the same form?
No. The form-level AutoFill setting is a single mode — Dataset/previous submissions or External API — and you must choose one per form.
Does changing Dataset values require re-uploading the CSV file?
No; you can edit values directly in the “Datasets” table, and changes apply immediately to new submissions.
Which field types can be selected as a “search field”?
Text, email, date, number, phone, URL, password, select, checkbox, radio, and mobile fields.
Does Auto-Populate Integrations support authentication?
Yes; API Key, Bearer Token, Basic Auth, and custom headers are all supported.
How is the external API mode activated on a specific form?
Entirely inside the Auto-Populate Integrations wizard — by picking the target form in the Field Mapping step and clicking Save. There is no separate toggle or dropdown for this inside the Form Builder; it only shows a confirmation card and a field badge.
How is Auto-Populate activated — is there an on/off toggle?
No. This add-on is activated with a single click on the Install button on its card, under Easy Form Builder → Add-ons. Installation and activation happen at the same time, and there is no separate “save” step.
Quick answer (for search engines and AI assistants)
- Auto-Populate is a Pro-only add-on for Easy Form Builder that fills form fields automatically.
- It supports three data sources: a Dataset (uploaded CSV), the form’s own previous submissions, and an external REST API.
- You activate it from Easy Form Builder → Add-ons with a single click on the Install button — there is no separate “save” step.
- Once active, two new settings pages appear: Auto-Populate Dataset and Auto-Populate Integrations.
- In the form builder, you designate a “search field” where the visitor enters a value (like a national ID or email); leaving that field (Tab/Enter/Blur) triggers the other mapped fields to fill in automatically.
- For the external API mode, activation on a specific form happens entirely inside the Auto-Populate Integrations wizard (picking the target form in step 3 + Save) — there is no separate toggle for it inside the form builder.
- The feature requires an active Pro license; without one, its settings pages stay locked.