Conditional Logic for WordPress Forms: Show & Hide Fields, Route Emails, and Skip Steps — No Code
The Conditional Logic add-on turns an ordinary Easy Form Builder form into a form that reacts to every answer. With a visual IF/THEN builder you decide which fields appear, which steps are skipped, which team gets the email, what confirmation shows, and what data flows to your CRM — based on what each visitor actually does.
Visual IF / THEN rules
Multi-step friendly
Conditional email, redirect & webhook
Test Mode before publish
Key takeaways
- What it is: Conditional Logic is a Pro add-on for Easy Form Builder that makes a form react to answers, URL parameters, user roles, steps, and payment results.
- No code: Every rule is built visually with an IF (condition) and a THEN (action). You never touch PHP, JavaScript, or CSS.
- What it controls: Fields, multi-step navigation, email routing, confirmation messages, redirects, and webhooks.
- Safe by design: Fields and steps hidden by a rule are skipped during validation, so hidden required fields never block a submission.
- Test before publish: Test Mode and the Rule Inspector show which rules Matched, Not matched, or were Skipped before real visitors arrive.
On this page
What is conditional logic in a WordPress form?
A traditional WordPress form is static: every visitor sees the same fields in the same order and triggers the same email. That is fine for a basic contact form, but it breaks down the moment your form has to serve more than one audience. A sales inquiry, a support ticket, and a job application each need different questions, different recipients, and different follow-ups — yet forcing everyone through one long, generic form leads to abandoned submissions and messy data.
The Conditional Logic add-on solves this by letting the form adapt to the person filling it out. Instead of building five separate forms, you build one intelligent form that reveals the right questions, routes to the right team, and confirms with the right message — automatically. It reads signals such as the visitor’s answers, values in the URL, whether they are logged in and their WordPress role, the current step of a multi-step form, and the outcome of a payment, then applies your rules to decide what happens next.
The anatomy of a rule
Read it as a sentence: “If the customer type is Business, then show the Company Name field and make it required.” That is the entire mental model — everything else is just more conditions and more actions.
Why conditional logic matters for conversions and operations
Smart forms are not a nice-to-have. They directly affect completion rates, lead quality, and how much manual sorting your team does after every submission.
Shorter, smarter forms
Visitors only see the questions relevant to them. Irrelevant fields and unnecessary steps disappear, which reduces friction and abandonment.
Better lead routing
Sales, support, hiring, event, and order requests are routed to the right inbox and the right follow-up based on the visitor’s answers.
Cleaner data
Clearing stale values and requiring fields only when relevant means fewer half-filled, contradictory submissions to clean up later.
Lightweight automation
Fire webhooks to your CRM or automation tool only for qualified submissions — not for every message that hits the form.
How to activate the Conditional Logic add-on
These steps follow the current structure of the plugin. The add-on’s internal name is AdnSMF, but you will see it labeled Conditional Logic Add-on in the admin.
👉 Click any step to expand it and view the matching screenshot.
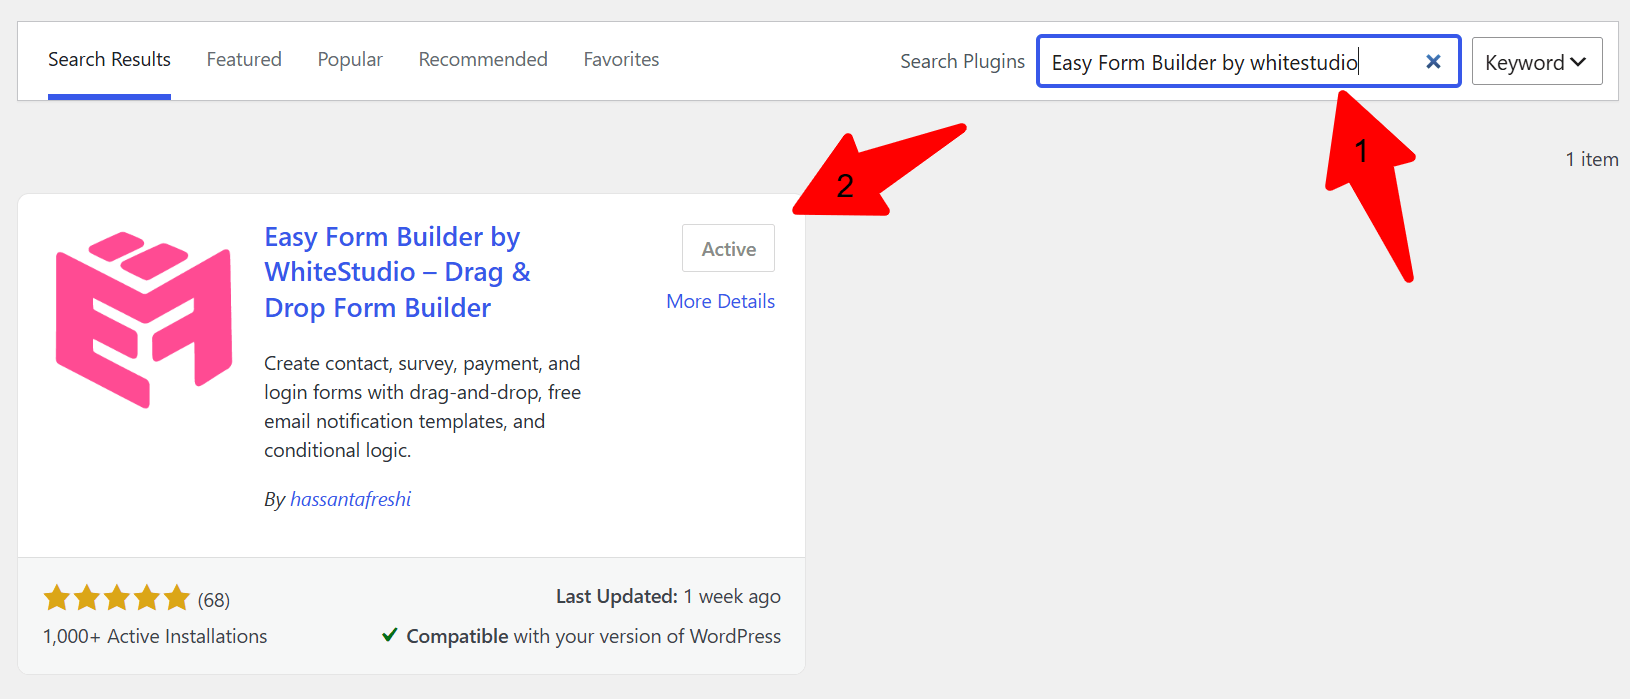
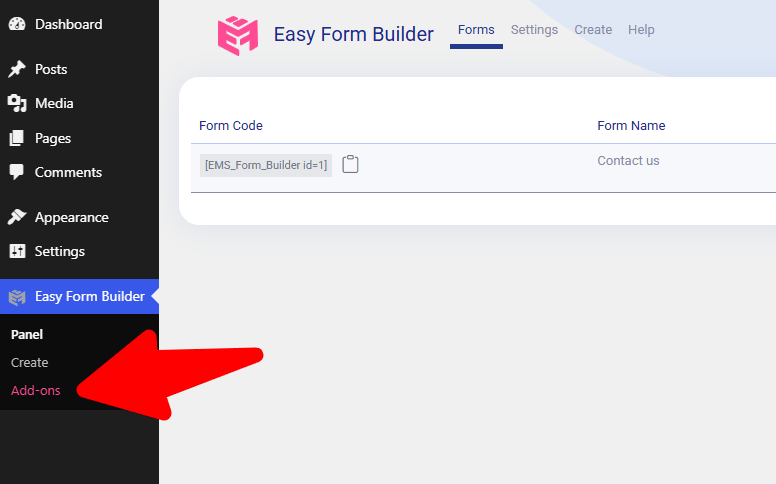
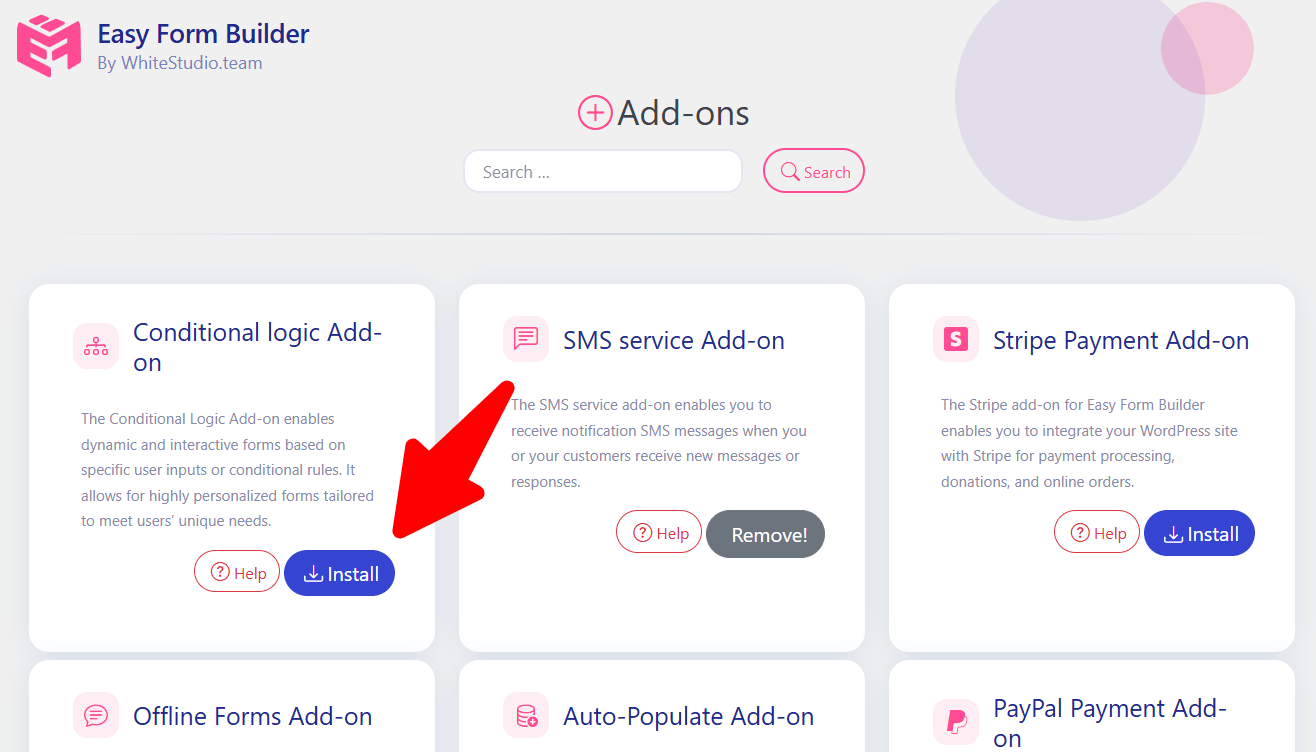
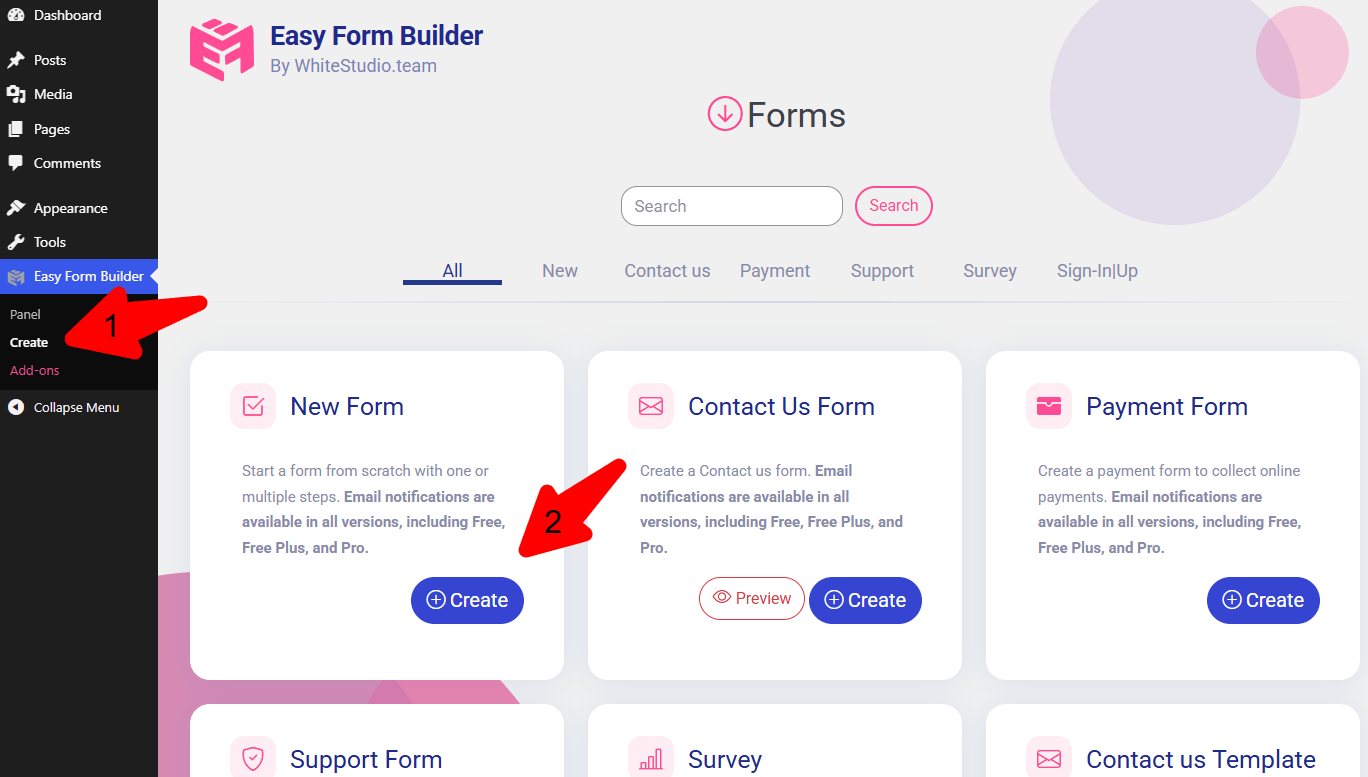
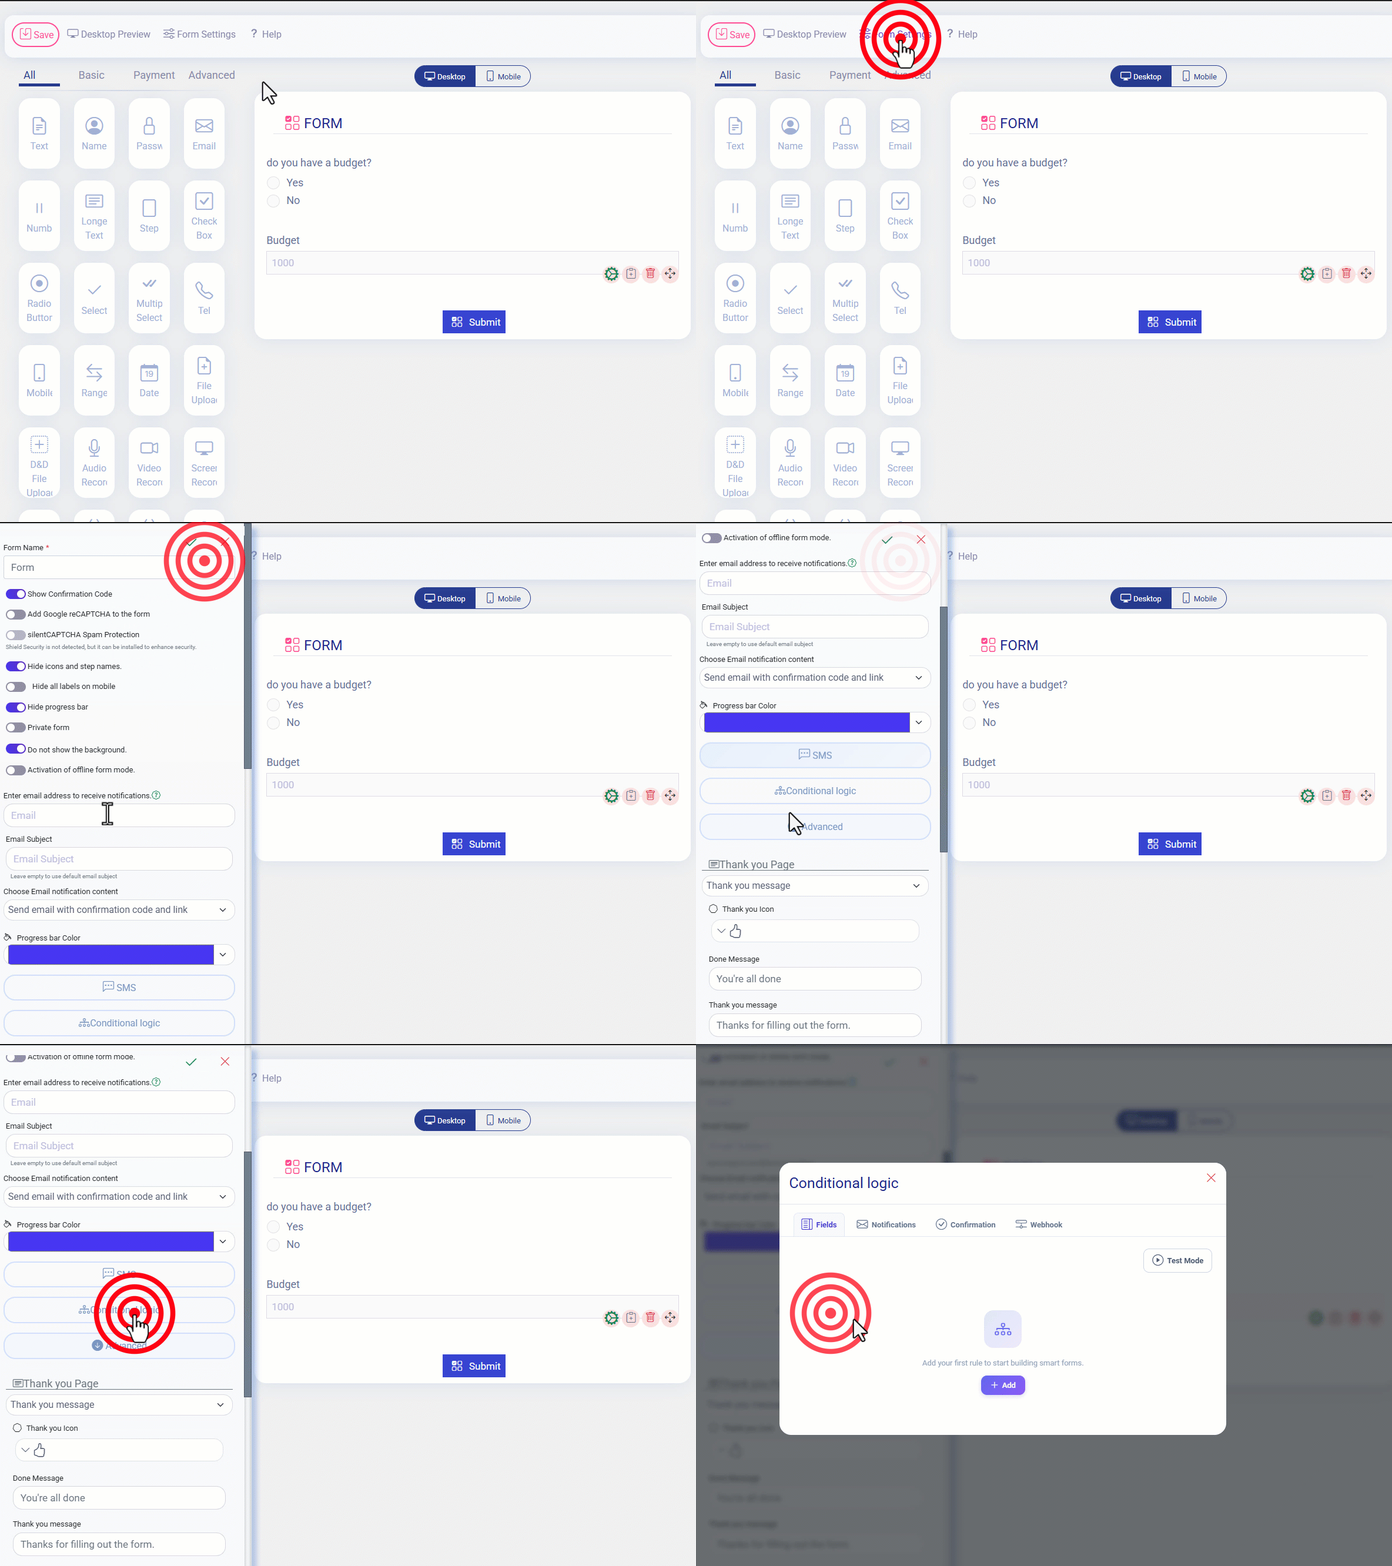
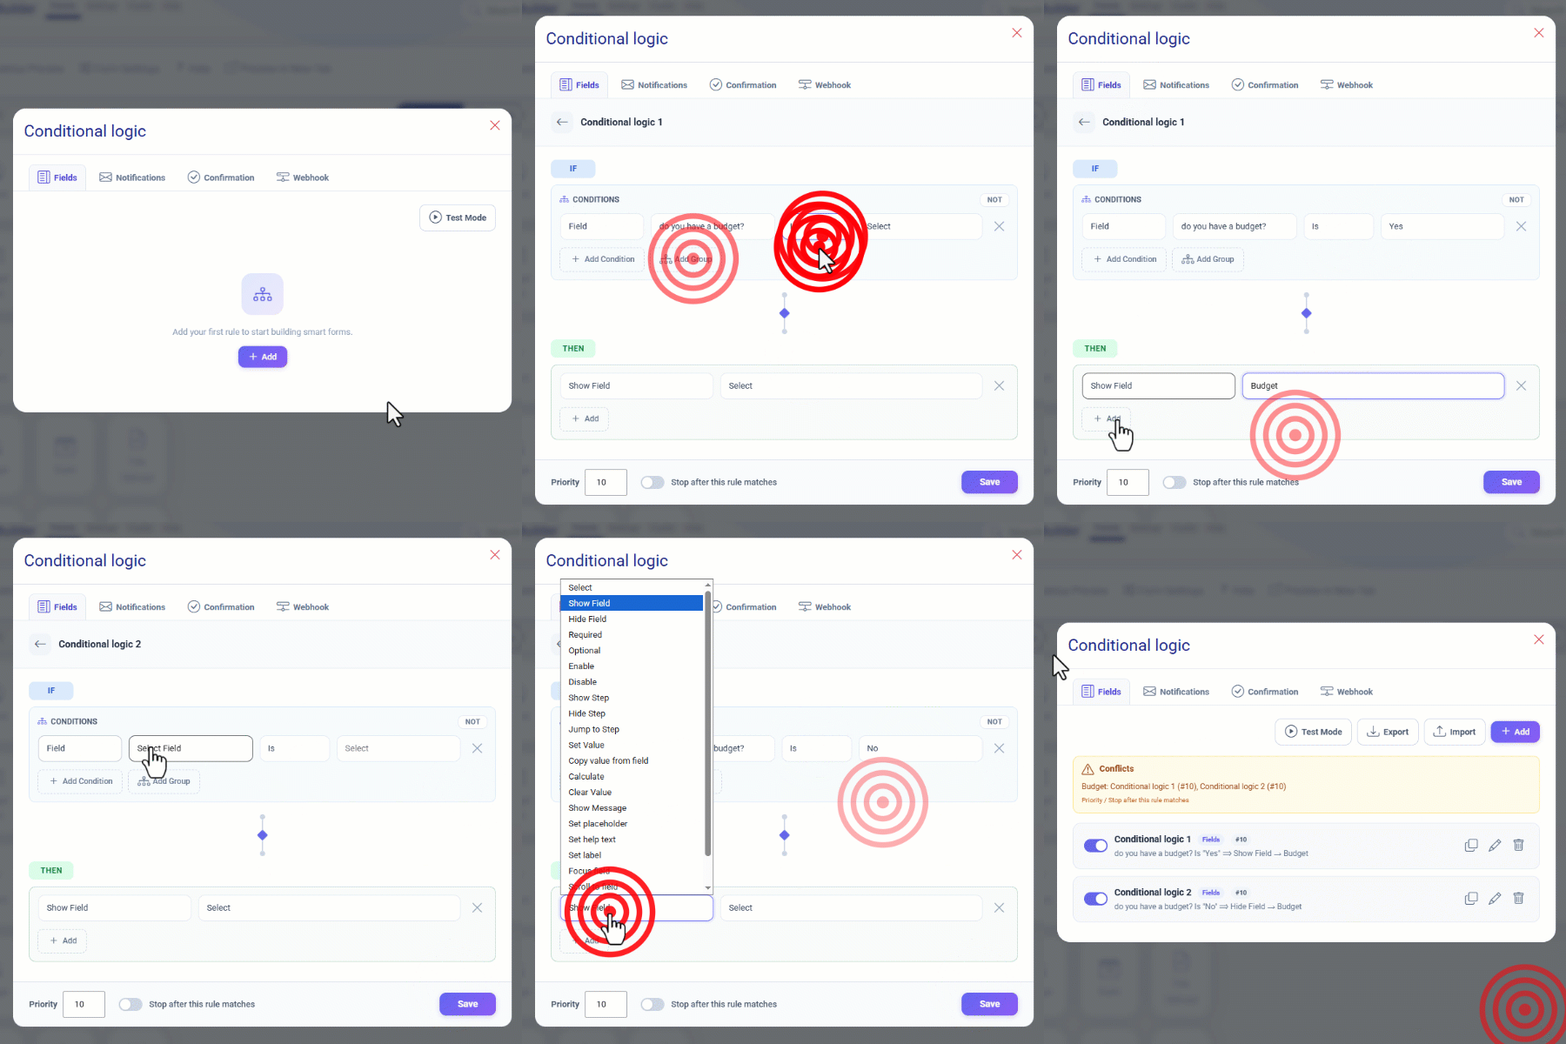
Tutorial: show a field only when a dropdown answer matches
This is the single most-searched task — how do I show a field based on the visitor’s answer? Here is the complete walkthrough, using a Business vs Personal example.
Step A — Prepare the fields
- Add a choice field named Customer Type.
- Give it two options: Personal and Business.
- Add the Company Name and VAT Number fields.
- If the form is multi-step, prepare the “Company details” step too.
Step B — Build the rule
- Open the Fields tab and click Add.
- In IF, choose the Customer Type field.
- Set the operator to is and pick the value Business.
- In THEN, add Show Field → Company Name.
- Add a second action: Set Required → Company Name.
- Save, then Test Mode with both values.
Now the Company Name field stays hidden for personal customers and only appears — already marked as required — when someone selects Business. Because hidden fields are skipped during validation, a personal customer is never blocked by a required field they never saw.
The four rule tabs, explained
Rules are organized into four tabs by what they control. You never edit code — each tab is a set of cards, dropdowns, and a Test Mode button.
Fields
Show, hide, require, make optional, enable, disable, set or clear values, and control multi-step navigation.
Notifications
Route conditional emails to the right team — sales, support, billing, or a specific recipient — with dynamic subjects.
Confirmation
Show a different thank-you message, change its title, color, and icon, or redirect the visitor after submission.
Webhook
Fire or stop a webhook based on answers, payment, or request type, and control which fields are sent in the payload.
See it in action: the Conditional Logic panel and its tabs
This is what conditional logic looks like inside Easy Form Builder. Every tab — Fields, Notifications, Confirmation, and Webhook — builds the same IF/THEN rule; only the outcome changes. Use these views to see exactly where to click when you want to show a field, route an email, redirect a visitor, or fire a webhook.
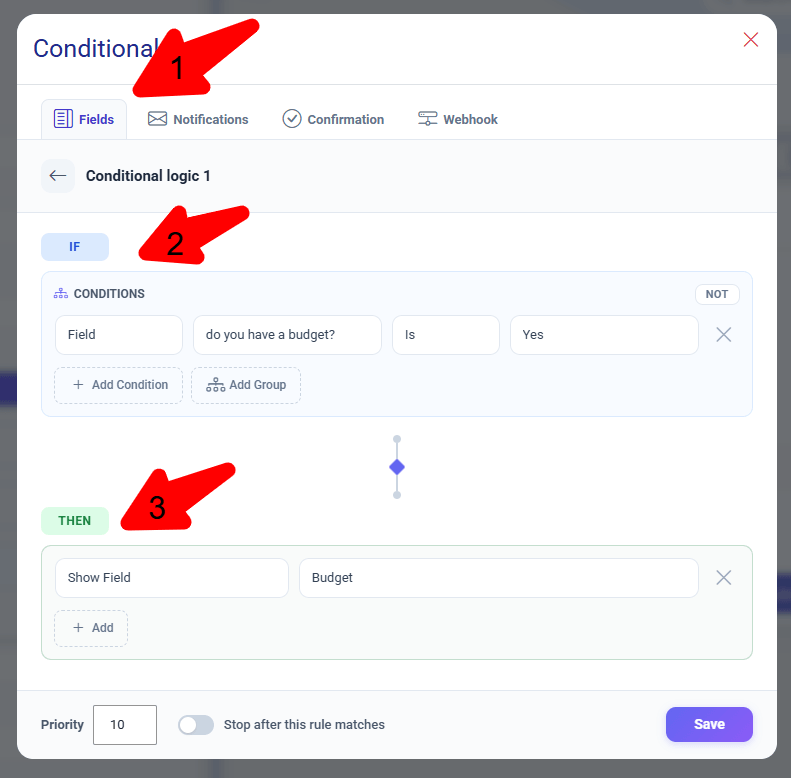
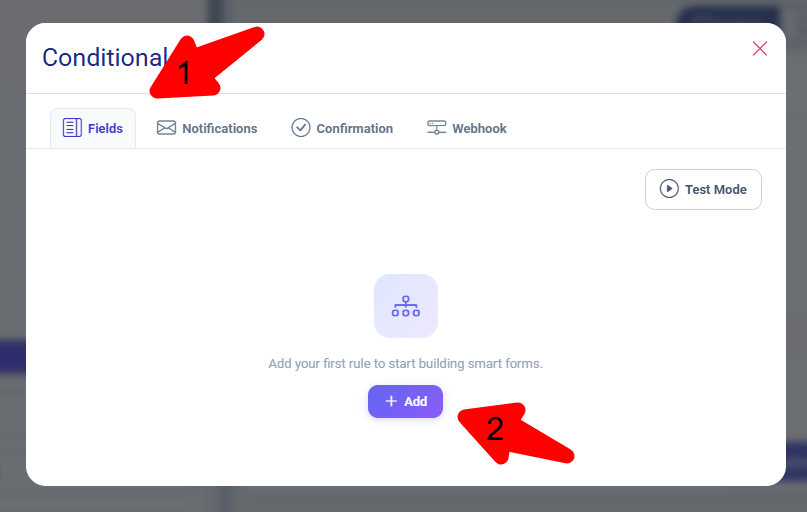
Screenshots reflect the current Easy Form Builder build; the Notifications, Confirmation, and Webhook views above illustrate each tab’s IF/THEN rule. Your exact screen may vary by plan and installed add-ons.
Full feature reference
Every action and condition type, with a plain-language benefit and the exact search phrase it answers. Items marked Pro require a Pro plan.
| Feature | What it does for you | Search phrase it answers |
|---|---|---|
| Show / Hide Field | Reveal or hide a field based on an answer. | show field based on dropdown answer |
| Set Required / Optional | Require a field only on the paths where it matters. | make field required only if |
| Enable / Disable Field | Lock a field without hiding it — great for prefilled or price fields. | disable form field conditionally |
| Show / Hide Step | Reveal or remove a whole step in a multi-step form. | skip step in multi step form |
| Jump to Step | Send the visitor straight to the relevant step. | jump to page conditional logic |
| Show Message | Display an inline hint or warning next to a field. | show message when option selected |
| Set / Clear Value | Auto-fill a value or clear a stale answer when the path changes. | clear field value when option changes |
| Copy Value From Field | Copy one field’s value into another without retyping. | copy value from another field |
| Dynamic Label / Placeholder / Help | Change a field’s wording based on the path. | change field label dynamically |
| Focus / Scroll to Field | Move attention to an important field after a choice. | auto scroll to field after selection |
| Block Submit / End Form | Stop submission with a message (age limit, low score, etc.). | prevent form submission conditionally |
| AND / OR / Groups | Combine conditions, e.g. Canada AND Business, or Sales OR Partnership. | form field AND OR condition group |
| NOT / NAND / NOR Pro | Invert a group’s result for advanced rules. | show field when NOT selected |
| URL Parameter Conditions | Adapt the form by campaign, UTM, or URL value. | conditional logic based on url parameter |
| User & Role Conditions | Show different paths for guests, logged-in users, or roles. | show field based on user role WordPress |
| Date Operators | Build conditions on before / after / between dates. | conditional logic before after date |
| Payment ConditionsPro | Act on paid, unpaid, or the amount paid. | conditional logic based on payment amount |
| Calculate Pro | Numeric formulas with the result shown in a target field. | calculate form field value formula |
| Conditional Notifications | Email the right team by request type, budget, or product. | send form email based on answer |
| CC / BCC & Subject Tokens | Add CC/BCC and inject field values into the subject. | dynamic email recipient contact form |
| Conditional ConfirmationPro | Show a tailored thank-you message per path. | different thank you message by answer |
| Conditional RedirectPro | Redirect to a specific page by answer or selected plan. | redirect after form submit based on answer |
| Redirect URL TokensPro | Pass field values to the destination URL. | pass form values to thank you page |
| Conditional WebhooksPro | Send data to CRM or automation only for the right paths. | send form to CRM only if condition |
| Webhook Stop & Payload FieldsPro | Stop a webhook or limit the fields sent externally. | choose which fields to send in webhook |
| Test Mode / Rule Inspector | Preview Matched / Not matched / Skipped before publishing. | test conditional logic before publishing |
| Priority & Stop ProcessingPro | Control rule order and prevent conflicts on one target. | conditional rule order conflict fix |
| Export / Import / Duplicate Pro | Copy and move rules between forms to save time. | copy conditional logic between forms |
Real-world forms you can build
The goal is one central form that chooses the right path — instead of maintaining several separate forms.
Smart contact form
Choose Sales and you’re asked for budget and company; choose Support and the order number or license key becomes required.
Quote request form
Guide low budgets to a helpful message, route standard budgets normally, and email high-value leads straight to a sales manager.
Event registration
Show VIP-only fields for premium tickets, hide the payment step for free tickets, and confirm with a message that matches the ticket.
Job application
Require a portfolio link for Designer roles, show a GitHub link for Developer roles, and send each application to the right hiring inbox.
Support triage
Separate technical, billing, and general requests, route each to the right email, and show a confirmation that fits the path.
Payment & order form
Fire the order webhook after a successful payment, email management for large amounts, and guide failed payments with a clear message.
Questions people search — and how this add-on answers them
If you are shopping for a conditional logic form plugin, these are the exact tasks people search for. Each one is a single rule in Easy Form Builder.
“Show a field only when a checkbox is checked”
IF checkbox is checked → THEN Show Field. The field stays hidden until the box is ticked, then appears instantly.
“Send the email to a different address per department”
Conditional email routing: IF department is Billing → THEN notify finance. This is the no-code answer to dynamic recipients.
“Skip a page in a multi-step form”
Use Hide Step or Jump to Step so free-plan visitors bypass the payment page entirely.
“Change the form based on a UTM or URL parameter”
Read the URL in the IF condition to prefill values or show campaign-specific fields for paid traffic.
“Different fields for logged-in users”
Conditions can read login status and WordPress role, so members and guests see different questions.
“Redirect to a different thank-you page by answer”
Conditional redirect sends each path to its own destination URL, with field tokens if needed.
Popular searches
show hide fields based on answer
conditional form builder
smart forms no code
multi step conditional form
conditional email notification
Specific, lower-competition searches
skip step for free ticket
make field required only if selected
conditional logic by url parameter
show field for logged in user role
conditional redirect by plan
clear value when option changes
send to CRM only for qualified leads
block submit if age under 18
Best practices for maintainable rules
A handful of habits keeps your conditional forms readable, testable, and easy to hand over.
Map the paths first
Before building anything, list the main journeys: personal vs business, sales vs support, paid vs unpaid.
Name rules clearly
“Show company fields for business users” beats “Rule 1” when you return six months later.
Test every path
One Test Mode run isn’t enough. Exercise each main path with realistic values before publishing.
Use priority for conflicts
If several rules touch one field, set Priority and “Stop after this rule matches” to avoid clashes.
Don’t fear hidden fields
Hidden fields and steps are ignored in validation, so required rules on them never trap the visitor.
Keep conditions minimal
Prefer a few clear rules over one giant nested group. Simpler logic is easier to test and debug.
Free vs Pro at a glance
Conditional Logic delivers value immediately, and Pro unlocks the advanced capabilities that serious sites, agencies, and businesses rely on.
| Capability | Free plans | Pro only |
|---|---|---|
| Show / hide / require fields | ✓ | — |
| Step logic (show, hide, jump) | ✓ | — |
| AND / OR conditions | ✓ | — |
| Test Mode | ✓ | — |
| Grouped conditions | — | ✓ |
| Conditional email, confirmation, redirect | — | ✓ |
| Rule Inspector | — | ✓ |
| Calculate (formula fields) | — | ✓ |
| NOT / NAND / NOR groups | — | ✓ |
| Export / import / duplicate rules | — | ✓ |
Troubleshooting common issues
I don’t see the Conditional Logic button
Open the Add-ons page and confirm the Conditional Logic Add-on is installed and active. On a Free plan the editor is replaced by an upgrade panel.
The button is there but the editor won’t open
Check your plan level, verify the add-on is active, and make sure the form contains fields the rules can target — an empty form has nothing to build rules on.
A rule isn’t firing
Run Test Mode and read the status: Matched, Not matched, or Skipped. A mismatched operator or value is the most common cause. Check rule Priority if two rules affect the same field.
A required field blocks submission unexpectedly
Confirm the field is actually hidden by a rule on that path. Hidden fields are skipped in validation; a field that is only disabled (not hidden) may still validate.
Frequently asked questions
How do I show a field based on a dropdown answer?
Open Conditional Logic, add a rule with IF = your dropdown equals a value, and a THEN action of Show Field on the target. The field appears the moment the answer matches — no code involved.
How do I route form emails to different people based on the answer?
In the Notifications tab, build a conditional rule that sets the recipient, subject, and template — e.g. Sales to the sales team, Billing to finance, and Technical to support. This is the no-code way to get dynamic email recipients.
Can I skip a step or page in a multi-step form?
Yes. Use Show Step, Hide Step, or Jump to Step in the Fields tab so visitors only see relevant steps — for example, skipping the payment page for free registrations.
Can the form change based on a URL parameter or user role?
Yes. Conditions can read URL parameters (like UTM/campaign values) and the visitor’s login status and WordPress role, so you can show different fields, emails, or redirects for different traffic sources and users.
Can I redirect the visitor to a different page after submitting?
Yes. In the Confirmation tab you can show a conditional message or redirect to a specific URL, and you can inject field tokens into the destination URL.
Do I need to know how to code?
No. Every rule is built visually in an IF/THEN interface. You choose the field, operator, value, and action — no PHP, JavaScript, or CSS.
Will a hidden required field block submission?
No. In the current add-on logic, any field or step hidden by a rule is ignored during validation and submission, so a visitor is never stopped by a required field they cannot see on their path.
How do I test conditional logic before publishing?
Run Test Mode. Enter sample values and see which rules are Matched, Not matched, or Skipped. It catches mistakes in complex paths before real submissions arrive.