Short answer: To get a WordPress Telegram notification for every form submission, create a bot with @BotFather, install the Telegram Notification Add-on of Easy Form Builder (Pro), enter the bot token and your Chat ID under Easy Form Builder » Telegram, click Test, then switch on Telegram in each form’s settings.
Quick facts
- Plan: Pro, plus the Telegram Notification Add-on (not included in Free or Free Plus)
- You need: a Telegram bot token from @BotFather and a Chat ID
- Sends: a message for each new submission and for each new reply on the response page
- Recipients: one or more Chat IDs, separated by commas
- Time: about 10 minutes
- Tested with: Easy Form Builder 4.3.1 on
- Requires: your server can reach
api.telegram.orgover HTTPS

Video transcript
Get a Telegram message every time someone submits your WordPress form. Here is how to set it up with the Telegram add-on of Easy Form Builder. First, create a bot. In Telegram, open @BotFather, send /newbot, choose a name and a username that ends in bot, and copy the token. Then message @WSYourIDBot to get your numeric chat ID. The Help tab of the add-on repeats these steps. In WordPress, open Easy Form Builder, Add-ons, and install the Telegram Notification Add-on. It is part of Easy Form Builder Pro. Then open the new Telegram menu. Until you finish, the status says Disabled. Switch on Enable Telegram Notifications, paste the bot token and your chat ID, and click Test. Your bot sends a test message to the chat. Click Save Settings, and the status changes to Enabled. Now open your form, click Form Settings, and in the Telegram section switch on Enable Telegram notifications. You can edit the message, with placeholders such as the confirmation code and the link to the entry. The Test Message tab sends any text you like, to check the connection at any time. Every message appears in the Activity Log with its status. The message itself carries the date, the confirmation code and a link, so the answers stay in WordPress. That is it. New submissions now reach you on Telegram in seconds. The full guide is linked below.
Before you start
- Easy Form Builder 4.3.1 or later with Pro activated. On Free or Free Plus the add-on card shows a Pro button instead of Install.
- The Telegram app on your phone or desktop.
- A server that allows outbound HTTPS to
api.telegram.org(most hosts do).
Step 1 — Create a Telegram bot and copy its token
- In Telegram, open @BotFather and send
/newbot. - Choose a name, then a username that ends in
bot, for examplemyforms_alert_bot. - BotFather replies with the bot token, a string like
123456789:AA…. Copy it and keep it private.
Send any message to your new bot once, so it is allowed to write to you.
Step 2 — Find your Telegram Chat ID
- To yourself (private chat): message @WSYourIDBot in Telegram and copy the numeric ID it returns. This is the method shown in the add-on’s own Quick Tips.
- To a channel: add your bot to the channel as an administrator and use
@channelusername. - To a group: add your bot to the group and use the group’s numeric ID (it starts with
-). Telegram returns it in thechat.idof getUpdates after someone writes in the group.
Tip: the bot must be allowed to post in the target chat. If the test says the bot is valid but cannot send to the chat, this is the reason.
Step 3 — Install the Telegram Notification Add-on
Open Easy Form Builder » Add-ons, find Telegram Notification Add-on and click Install. A new Telegram item appears in the Easy Form Builder menu.

Step 4 — Connect the bot to WordPress
Open Easy Form Builder » Telegram. The Settings tab shows the status (Disabled until you finish), the fields and Quick Tips; the Help tab repeats the setup steps.

- Switch on Enable Telegram Notifications.
- Paste the token into Bot Token and your ID into Chat ID. For several recipients, separate the Chat IDs with commas.
- Click Test. Easy Form Builder checks the token with Telegram and sends ✅ Connection test successful! Your Telegram bot is ready. to the chat.
- Click Save Settings. The status changes to Enabled.


Tip: test with one Chat ID at a time; the Test button sends to the value in the field as a single chat.
Step 5 — Turn on Telegram notifications for a form
Open the form in the builder, click Form Settings and go to the Telegram section. Switch on Enable Telegram notifications and save the form. Only forms with this switch on send messages.
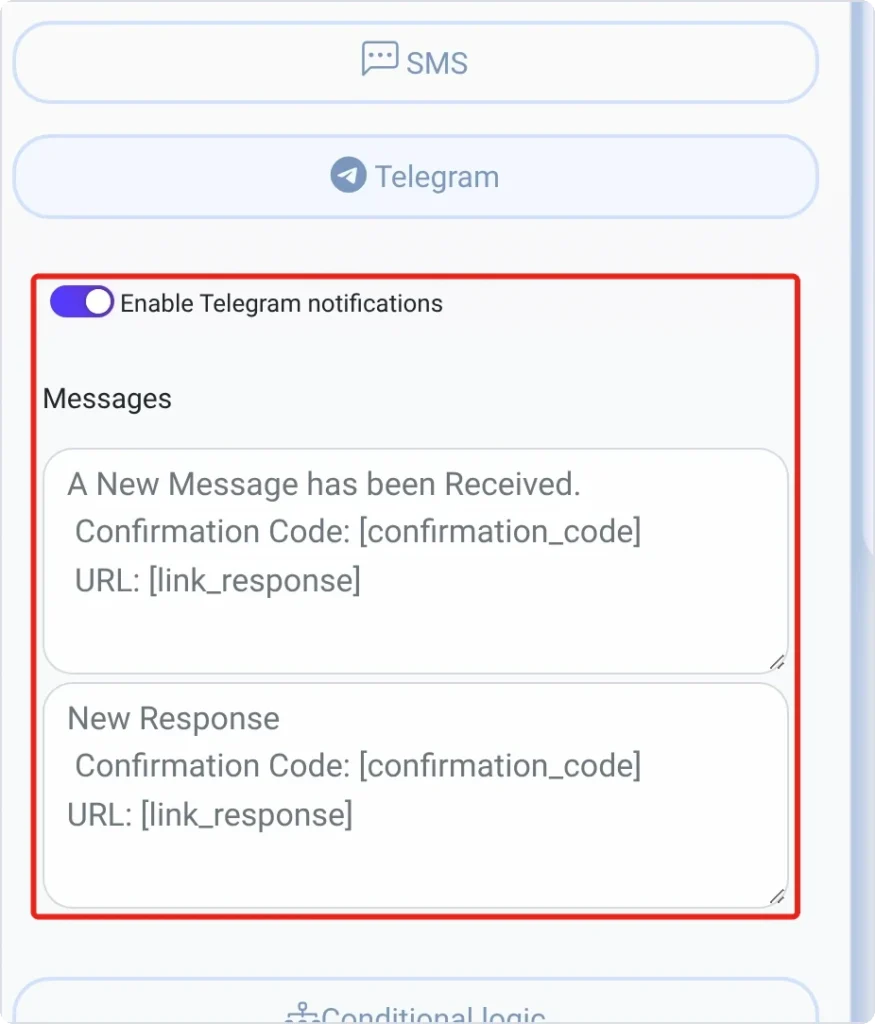
The section has two message templates: one for a new submission and one for a new reply on the response page. The defaults are:
A New Message has been Received.+Confirmation Code: [confirmation_code]+URL: [link_response]New Response+ the confirmation code and link
You can use [confirmation_code], [link_response], [link_page], [link_domain] and [website_name] in the templates.
What the Telegram message contains
Each message starts with the date and time, followed by your template. It does not include the answers from the form: you open them through the link, after logging in. This keeps personal data out of the Telegram chat.
Messages are sent when a visitor submits the form (also payment, survey, login and registration forms) and when someone replies on the form’s response page.
Step 6 — Send a test message and check the Activity Log
The Test Message tab sends a text of your choice with Send Test Message. The Activity Log tab lists every message with its date, sender (Test or System), Chat ID, the start of the message and its status, 20 per page.


Troubleshooting Telegram notifications
| Symptom | Likely cause | Fix |
|---|---|---|
| Please fill in all required fields | Bot Token or Chat ID is empty | Fill in both fields |
| Invalid bot token: … | The token was copied wrongly or revoked | Copy the token again from @BotFather |
| Bot is valid but cannot send to this chat: … | Wrong Chat ID, or the bot is not allowed in that chat | Message the bot first; add it to the group, or as admin to the channel |
| Connection failed: … | The server cannot reach api.telegram.org | Ask your host to allow outbound HTTPS to api.telegram.org |
| Nothing arrives and the Activity Log is empty | The global switch or the form’s switch is off | Enable both: Telegram settings and the form’s Telegram section |
| A row with status Failed | Telegram refused that message | Run Test with the same Chat ID to see the reason |
| The Telegram switch in the form shows an install message | The add-on is not installed | Install the Telegram Notification Add-on (step 3) |
Frequently asked questions
Is the Telegram add-on free?
No. The Telegram Notification Add-on is part of Easy Form Builder Pro. Telegram itself and the bot are free.
Can I send notifications to a Telegram group or channel?
Yes. Add the bot to the group, or as an administrator to the channel, and use the group’s numeric ID or @channelusername as the Chat ID.
Can several people get the notification?
Yes. Enter several Chat IDs separated by commas; each one gets its own message and its own line in the Activity Log.
Does the message include the form answers?
No. It contains the date, your template, the confirmation code and a link to the entry, so personal data stays in WordPress.
Does it replace email notifications?
No, it works alongside them. Keep email notifications on as well.
What’s next
New submissions now reach you on Telegram within seconds.
- Set up form notification emails — the classic channel next to Telegram
- Send an SMS after a WordPress form submission
- Manage form submissions in WordPress
- Telegram add-on developer guide — hooks and internals
Published for Easy Form Builder 4.3.1 on , with screenshots of the current version.
